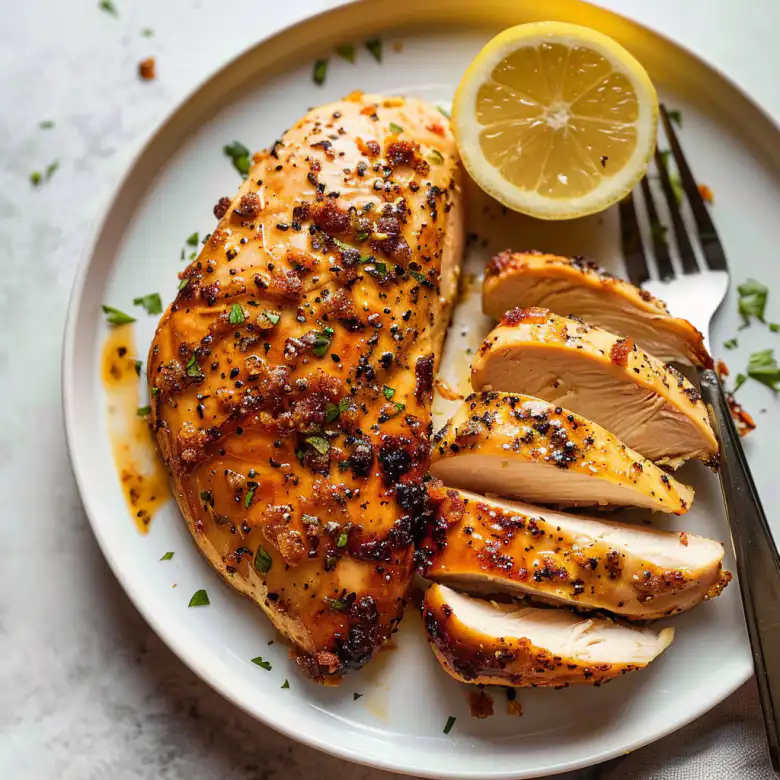
There are countless ways to cook chicken breasts, but for sheer simplicity and reliable results, baking wins for me. It’s the method I turn to when I need a healthy, protein-packed meal without a lot of fuss. This recipe is all about taking those often-intimidating lean breasts and ensuring they come out juicy and flavorful, every single time.
Why This Failproof Baked Chicken Breasts Works
This recipe’s success lies in a few key techniques: starting with room temperature chicken for even cooking, a simple yet effective seasoning blend, and understanding how to avoid both undercooking and overcooking. The oven does the heavy lifting, transforming a humble chicken breast into a tender and delicious centerpiece for any meal.
Ingredients
- 1.5 – 2 pounds boneless, skinless chicken breasts (about 2-3 large breasts)
- 2 tablespoons olive oil or avocado oil
- 1 teaspoon salt
- 1/2 teaspoon black pepper
- 1 teaspoon garlic powder
- 1/2 teaspoon onion powder
- 1/2 teaspoon paprika (smoked or sweet)
- Optional: Fresh herbs like rosemary or thyme sprigs, lemon slices
With these foundational ingredients readily available in most kitchens, you’re already halfway to a satisfying meal.
How to Make It
- Preheat and Prepare: Preheat your oven to 400°F (200°C). Line a baking sheet with parchment paper or aluminum foil for easy cleanup. This step is crucial for preventing sticking and simplifying the post-meal tidying.
- Bring to Room Temperature: Remove the chicken breasts from the refrigerator about 20-30 minutes before you plan to cook them. This allows them to come closer to room temperature, which helps them cook more evenly. Cold chicken straight from the fridge can cook inconsistently, leading to dry edges and undercooked centers. I’ve found this small step makes a noticeable difference in the final texture.
- Trim and Pat Dry: Trim any excess fat or sinew from the chicken breasts. Then, pat them thoroughly dry with paper towels. Dry chicken means better browning (even in the oven) and helps the seasonings adhere more effectively. This is a simple step, but don’t skip it!
- Season Generously: Place the chicken breasts on the prepared baking sheet. Drizzle them with olive oil or avocado oil, ensuring each breast is lightly coated. In a small bowl, combine the salt, black pepper, garlic powder, onion powder, and paprika. Sprinkle this seasoning mixture evenly over both sides of the chicken breasts. Don’t be shy with the seasoning; it’s what builds the flavor foundation. If you’re feeling adventurous, you can add other spices like a pinch of cayenne for heat or a little dried oregano.
- Optional Aromatics: If you’re using fresh herbs or lemon slices, arrange them on or around the chicken breasts on the baking sheet now. They’ll infuse a wonderful subtle flavor as the chicken bakes.
- Bake Accordingly: Place the baking sheet in the preheated oven. Bake for 20-25 minutes, or until the chicken reaches an internal temperature of 165°F (74°C) when measured with a meat thermometer inserted into the thickest part of the breast. The exact cooking time will depend on the thickness of your chicken breasts. Thicker breasts will take longer than thinner ones. It’s always better to check with a thermometer than to guess.
- Rest is Key: Once cooked, **remove the chicken breasts from the oven and let them rest on the baking sheet (or a clean cutting board) for 5-10 minutes before slicing or serving.** This resting period is absolutely essential for juicy chicken. It allows the juices to redistribute throughout the meat; if you slice it immediately, all that lovely moisture will escape, leaving you with drier chicken. Tent loosely with foil if you want to keep them warm while resting.
These straightforward steps culminate in consistently tender and flavorful baked chicken breasts, ready to be enjoyed.
You might love this: Easy Chicken Burrito Casserole Recipe
Nutrition at a Glance
- High in lean protein, essential for muscle repair and satiety.
- Low in saturated fat, supporting heart health.
- A good source of B vitamins, which are crucial for energy metabolism.
- Contains minerals like selenium, important for immune function.
- Versatile base for healthy eating, pairing well with a wide range of sides.
- Lower in calories compared to other protein sources when prepared without heavy sauces.
- Can be a good option for weight management plans due to its protein content and relatively low calorie count.
- The chosen cooking method (baking) avoids the added fats associated with frying.
- Can contribute to a feeling of fullness, potentially reducing overall food intake.
- Provides phosphorus, vital for bone health and energy production.
How to Serve It
- Slice thinly and add to salads for a protein boost.
- Serve whole alongside roasted vegetables and a grain like quinoa or brown rice.
- Shred or dice for use in tacos, wraps, or enchiladas.
- Pair with a simple side of steamed broccoli and a baked sweet potato.
- Incorporate into a hearty soup or stew.
- Serve with a dollop of Greek yogurt or a light vinaigrette for added moisture and flavor.
- Use as a filling for sandwiches or paninis.
- Build a healthy bowl with your favorite grains, greens, and vegetables, topped with the chicken.
- Enjoy alongside mashed cauliflower for a lower-carb option.
- Serve with a side of fresh fruit for a well-rounded meal.
These baked chicken breasts are a wonderfully adaptable protein, fitting seamlessly into countless meal configurations throughout your week.
Common Mistakes
- Cooking Straight from the Fridge: As mentioned, cold chicken cooks unevenly. Bringing it closer to room temperature ensures a more consistent bake, preventing dry outer layers and a potentially undercooked center. This is a small step that yields significant results in tenderness and moisture.
- Not Patting the Chicken Dry: Moisture on the surface of the chicken steams instead of sears (even in the oven). This can lead to a paler, less flavorful exterior and can inhibit the seasoning from adhering properly. A good pat-down with paper towels is quick and effective.
- Under- or Over-Seasoning: While this recipe provides a good baseline, individual preferences vary. Tasting your seasoning blend before applying it can help prevent disappointment. Conversely, being too timid can result in bland chicken. It’s a balance to find, and this blend leans towards being flavorful without being overwhelming. Use a thermometer to avoid overcooking, which is a more common culprit for dryness than under-seasoning.
- Skipping the Rest: This is arguably the most critical step for juicy chicken. When chicken cooks, the muscle fibers tighten and push juices toward the center. Resting allows these fibers to relax and redistribute the juices back throughout the meat. Cutting into it too soon means those precious juices will run out onto your cutting board, leaving the chicken drier. Patience here pays off in significant moisture.
- Using the Wrong Temperature: Baking at too low a temperature can take too long, drying out the exterior before the interior is cooked. Baking at too high a temperature without adjusting time can lead to a charred exterior and still-raw interior. The 400°F temperature strikes a good balance for cooking relatively quickly while achieving a nice mild sear on the surface.
- Not Using a Thermometer: Relying on visual cues or timed recipes alone can be unreliable, as chicken breast thickness varies greatly. A meat thermometer is an inexpensive tool that guarantees you hit the safe cooking temperature without overcooking. It’s the single best way to ensure tender, safe chicken every time.
- Cooking in a Single Layer Too Tightly Packed: Give the chicken breasts some breathing room on the baking sheet. Overcrowding can lead to uneven cooking and steaming rather than roasting, resulting in a less appealing texture and flavor. Ensure there’s some space between each piece.
- Not Trimming Tough Bits: Excess fat, gristle, or particularly tough membranes can affect the texture. Taking a moment to trim these away before cooking ensures a more pleasant eating experience.
Avoiding these common pitfalls is key to consistently producing delicious, moist baked chicken breasts that you’ll be happy to serve again and again.

Storage and Reheating
- Storage: Once cooled to room temperature, store cooked chicken breasts in an airtight container in the refrigerator for up to 3-4 days. Ensure the container is well-sealed to prevent the chicken from drying out.
- Reheating Gently: For best results, reheat chicken breasts gently to avoid drying them out. You can:
- In the Oven: Place chicken breasts in a small oven-safe dish with a tablespoon or two of water, broth, or olive oil. Cover with foil and reheat at 300-325°F (150-160°C) for 10-15 minutes, or until heated through.
- In the Microwave: Place chicken breasts on a microwave-safe plate with a splash of liquid. Cover with a damp paper towel and microwave on 50% power for 1-2 minutes, checking for doneness and continuing in short intervals as needed.
- In a Skillet: Slice or dice the chicken and reheat gently in a non-stick skillet over medium-low heat with a little oil or butter until warmed through.
- Freezing: If you won’t use the chicken within 3-4 days, it can be frozen. Wrap individual breasts tightly in plastic wrap, then place them inside a freezer-safe bag or container. Frozen chicken breasts will keep for 2-3 months. Thaw in the refrigerator overnight before reheating using the methods above.
- Preventing Dryness: The key to reheating chicken without drying it out is to use low, gentle heat and to add a little moisture. Adding a liquid to the reheating process helps to steam the chicken and keep it moist.
- Check Temperature When Reheating: Always ensure that reheated chicken reaches an internal temperature of 165°F (74°C) before serving to ensure it is safe to eat.
Proper storage and reheating ensure that your delicious baked chicken breasts remain a convenient and tasty option throughout the week.
Leftover Ideas
- Chicken Salad Sandwiches: Dice or shred leftover chicken, mix with mayonnaise, celery, onion, and seasonings for a classic chicken salad.
- Quick Tacos or Burritos: Shred the chicken and warm it with some taco seasoning. Serve in tortillas with your favorite toppings.
- Hearty Soups: Add diced chicken to a vegetable, chicken noodle, or tortilla soup to make it more filling.
- Pasta Dishes: Toss sliced or diced chicken into your favorite pasta sauce or a pre-made pasta salad.
- Stuffed Bell Peppers: Mix shredded chicken with rice, vegetables, and sauce, then stuff into bell pepper halves and bake.
- Cauliflower Rice Bowls: Top cauliflower rice with diced chicken, your favorite veggies, and a drizzle of sesame ginger sauce for a healthy bowl.
- Quesadillas: Layer shredded chicken with cheese and other fillings between tortillas and grill until golden and cheesy.
- Stir-Fries: Add diced chicken towards the end of cooking your favorite vegetable stir-fry.
- Chicken and Rice Casserole: Combine diced chicken with cooked rice, a creamy sauce (like cream of mushroom soup or a béchamel), and vegetables for a comforting casserole.
- Power Salads: Chop the chicken and add it to a grain bowl or a hearty salad with mixed greens, nuts, seeds, and a flavorful dressing.
Leftover baked chicken breasts are a cook’s best friend for quick and easy meals, proving their value far beyond the initial preparation.
Failproof Baked Chicken Breasts
- Total Time: 35 minutes
- Yield: 4 servings 1x
Description
Learn how to bake juicy, tender chicken breasts every time with this simple and reliable recipe. Perfect for weeknight meals!
Ingredients
- 1.5 – 2 pounds boneless, skinless chicken breasts (about 2–3 large breasts)
- 2 tablespoons olive oil or avocado oil
- 1 teaspoon salt
- 1/2 teaspoon black pepper
- 1 teaspoon garlic powder
- 1/2 teaspoon onion powder
- 1/2 teaspoon paprika (smoked or sweet)
- Optional: Fresh herbs like rosemary or thyme sprigs, lemon slices
Instructions
- 1. Preheat your oven to 400°F (200°C). Line a baking sheet with parchment paper or aluminum foil.
- 2. Remove chicken breasts from the refrigerator about 20-30 minutes prior to cooking.
- 3. Trim any excess fat and pat the chicken breasts thoroughly dry with paper towels.
- 4. Place the chicken breasts on the prepared baking sheet. Drizzle with olive oil or avocado oil.
- 5. In a small bowl, combine salt, pepper, garlic powder, onion powder, and paprika. Sprinkle evenly over both sides of the chicken.
- 6. Add any optional herbs or lemon slices onto the baking sheet.
- 7. Bake in the preheated oven for 20-25 minutes, or until an instant-read thermometer registers 165°F (74°C) in the thickest part of the breast.
- 8. Let the chicken rest on the baking sheet for 5-10 minutes before slicing or serving.
Notes
Store cooked chicken in an airtight container in the refrigerator for up to 3-4 days. Reheat gently in the oven, microwave, or skillet with a little added liquid to maintain moisture. Can be frozen for 2-3 months.
- Prep Time: 10 minutes
- Cook Time: 25 minutes
- Category: Main Course
- Method: Baking
- Cuisine: American
Nutrition
- Serving Size: 1 breast
- Calories: 200
- Sugar: 0g
- Sodium: 450mg
- Fat: 8g
- Carbohydrates: 1g
- Fiber: 0g
- Protein: 30g