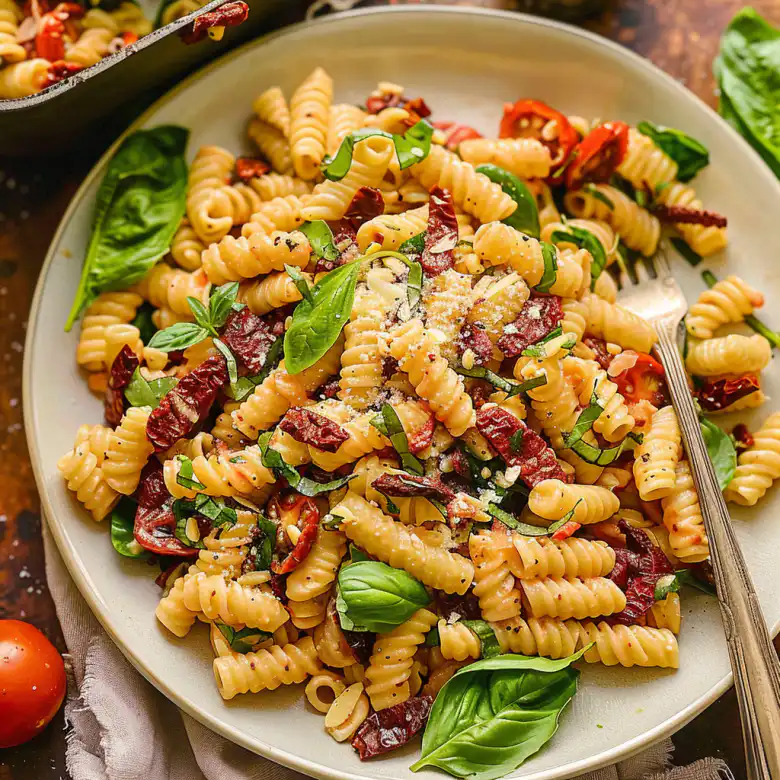
This vibrant pasta salad combines tender pasta with oil-packed sun-dried tomatoes, fresh basil, and creamy mozzarella for a dish that tastes even better the next day. I’ve been making this recipe for family gatherings and potlucks for years, and it never fails to disappear quickly from the table.
Why This Sun-Dried Tomato Pasta Salad Works
The magic happens when oil-packed sun-dried tomatoes meet al dente pasta and fresh herbs. The tomatoes add concentrated flavor while their oil creates part of the dressing. This combination delivers bold Mediterranean flavors that develop beautifully as the salad sits, making it ideal for meal prep.
Ingredients
• 1 pound fusilli or rotini pasta
• 1 cup oil-packed sun-dried tomatoes, chopped (reserve 3 tablespoons oil)
• 8 ounces fresh mozzarella, cubed
• 1/2 cup fresh basil leaves, chopped
• 1/4 cup pine nuts, toasted
• 1/3 cup extra virgin olive oil
• 3 tablespoons red wine vinegar
• 2 cloves garlic, minced
• 1 teaspoon dried oregano
• 1/2 teaspoon salt
• 1/4 teaspoon black pepper
• 1/4 cup grated Parmesan cheese
• 1/2 red onion, thinly sliced
• 2 tablespoons capers, drained
These ingredients create layers of flavor and texture that make each bite interesting and satisfying.
Check this out: Garlic Butter Bowtie Pasta with Beef Perfection
How to Make It
1. Cook the pasta in a large pot of salted boiling water according to package directions until al dente. Drain and rinse with cold water to stop the cooking process. Set aside in a large mixing bowl.
2. While the pasta cooks, prepare your dressing by whisking together the reserved sun-dried tomato oil, olive oil, red wine vinegar, minced garlic, oregano, salt, and pepper in a small bowl. Taste and adjust seasoning as needed.
3. Add the chopped sun-dried tomatoes to the cooled pasta along with the cubed mozzarella, sliced red onion, and drained capers. Toss gently to distribute evenly.
4. Pour the dressing over the pasta mixture and toss thoroughly to coat all ingredients. The pasta should look glossy and well-dressed, but not swimming in oil.
5. Add the fresh basil, toasted pine nuts, and grated Parmesan cheese. Fold these in gently to avoid bruising the basil leaves.
6. Cover the bowl with plastic wrap and refrigerate for at least 2 hours, though overnight is even better. This chilling time allows the flavors to meld and intensify.
7. Before serving, let the salad sit at room temperature for 15-20 minutes and give it another gentle toss. Taste and add more salt, pepper, or a splash of vinegar if needed.
This method ensures every component maintains its texture while the flavors blend beautifully together.
Nutrition at a Glance
• High in protein from mozzarella cheese and pine nuts
• Good source of complex carbohydrates from pasta
• Contains healthy fats from olive oil and nuts
• Provides lycopene from sun-dried tomatoes
• Rich in calcium from cheese
• Includes antioxidants from fresh basil and garlic
• Moderate sodium content, easily adjustable
• Vegetarian-friendly with complete proteins
This pasta salad offers a balanced mix of macronutrients that makes it satisfying as either a side dish or light main course. The combination of protein, healthy fats, and complex carbohydrates helps maintain steady energy levels, while the vegetables and herbs contribute essential vitamins and minerals.
How to Serve It
• Alongside grilled chicken or fish for a complete meal
• As part of a Mediterranean-themed buffet spread
• With crusty bread and a simple green salad
• At room temperature for outdoor gatherings
• As a make-ahead lunch option throughout the week
• Garnished with additional fresh basil and pine nuts
• With extra Parmesan cheese on the side for guests
This salad shines when served at room temperature, which allows all the flavors to be at their most vibrant and aromatic.
The versatility of this dish makes it suitable for casual weeknight dinners or more formal entertaining. I often serve it as part of a larger spread during summer gatherings because it holds up well in warm weather and doesn’t require last-minute preparation. The colorful appearance makes it an attractive addition to any table, and the familiar flavors appeal to both adults and children.
When serving for a crowd, I like to provide small bowls of extra ingredients on the side – additional pine nuts, fresh basil leaves, and grated Parmesan – so guests can customize their portions. This approach accommodates different preferences while maintaining the integrity of the original dish.
Common Mistakes
• Overcooking the pasta, which leads to mushy texture
• Using sun-dried tomatoes packed in water instead of oil
• Adding the basil too early, causing it to wilt and darken
• Not allowing enough time for flavors to develop before serving
• Serving the salad too cold, which mutes the flavors
• Skipping the pasta water rinse, leaving excess starch
• Over-dressing the salad, making it greasy rather than flavorful
Avoiding these pitfalls ensures your pasta salad has the right texture and balanced flavors that make it truly memorable.
The most critical mistake I see home cooks make is rushing the process. This salad truly benefits from time – time for the pasta to cool properly, time for the dressing to be absorbed, and time for all the flavors to meld in the refrigerator. I’ve learned that making it a day ahead actually improves the overall taste significantly.
Another common issue is the temperature at which the salad is served. While it needs to be chilled for food safety and flavor development, serving it ice-cold from the refrigerator dulls the taste. Allowing it to come closer to room temperature before serving makes a noticeable difference in how vibrant the flavors taste.
The quality of ingredients also matters more than you might think. Oil-packed sun-dried tomatoes have a completely different flavor and texture than the dried variety that needs rehydration. The oil they’re packed in becomes part of your dressing, so choosing a good quality brand makes a real difference in the final result.
Storage and Reheating
• Store covered in the refrigerator for up to 4 days
• Bring to room temperature before serving for best flavor
• Add fresh basil and a drizzle of olive oil to refresh leftovers
• Do not freeze, as the texture of pasta and cheese will suffer
• Store in individual portions for easy grab-and-go meals
• Keep dressing ingredients separate if making more than 2 days ahead
• Use glass or ceramic containers to prevent staining
Proper storage maintains the salad’s fresh taste and appealing texture throughout the week.
This pasta salad is actually one of those rare dishes that improves with time, up to a point. The first day it’s good, the second day it’s even better as the flavors have had time to mingle. By the third day, it’s still delicious but you might want to refresh it with a bit of fresh basil or a light drizzle of good olive oil.
I’ve found that storing it in individual serving containers makes it incredibly convenient for packed lunches or quick dinners. The portions stay fresh longer when they’re not exposed to air repeatedly, and it’s easier to grab exactly what you need.
If you’re planning to keep the salad for the full four days, consider holding back some of the fresh basil and adding it to individual portions as you serve them. This keeps the herb looking and tasting fresh rather than wilted and dark.

Leftover Ideas
• Stuff into pita pockets with additional greens for a hearty sandwich
• Serve over fresh spinach or arugula as a composed salad
• Use as a filling for stuffed bell peppers or tomatoes
• Mix with additional vegetables to stretch into more servings
• Serve warm as a side dish by briefly heating in a skillet
• Add cooked chicken or shrimp to transform into a main course
• Use as a topping for bruschetta or crostini
These creative approaches help you enjoy the salad in new ways while minimizing food waste.
One of my favorite ways to repurpose leftovers is to add some fresh spinach or arugula and serve it as a more substantial salad. The pasta salad becomes like a flavorful topping that transforms simple greens into something special. A little extra lemon juice or vinegar helps brighten everything up.
PrintKool-Aid Slushie
- Total Time: 5 minutes
- Yield: 4 servings 1x
- Diet: Vegetarian
Description
A refreshing, icy frozen drink made with Kool-Aid, ice, and sugar that’s perfect for hot summer days. Ready in just 5 minutes with simple ingredients.
Ingredients
- 4 cups ice cubes
- 1 packet Kool-Aid drink mix (unsweetened)
- 1 cup granulated sugar
- 2 cups cold water
- 2 tablespoons lemon juice (optional)
Instructions
- 1. Add ice cubes to the blender first, followed by the cold water.
- 2. Sprinkle the Kool-Aid packet and sugar over the ice and water mixture. Add lemon juice if using.
- 3. Secure the blender lid tightly and start blending on low for 10 seconds to break up the ice.
- 4. Gradually increase speed to high and blend for 30-45 seconds until smooth and slushy.
- 5. Check consistency and adjust if needed by adding more ice for thickness or water if too thick.
- 6. Pour immediately into pre-chilled glasses and serve right away.
Notes
For best results, use very cold water and serve immediately. Leftovers can be frozen in an airtight container for up to 2 weeks. To re-use, let thaw slightly and scrape with a fork. Try mixing different Kool-Aid flavors or adding fresh fruit for variation.
- Prep Time: 5 minutes
- Cook Time: 0 minutes
- Category: Beverages
- Method: Blending
- Cuisine: American
Nutrition
- Serving Size: 1 cup
- Calories: 120
- Sugar: 30g
- Sodium: 15mg
- Fat: 0g
- Carbohydrates: 31g
- Fiber: 0g
- Protein: 0g