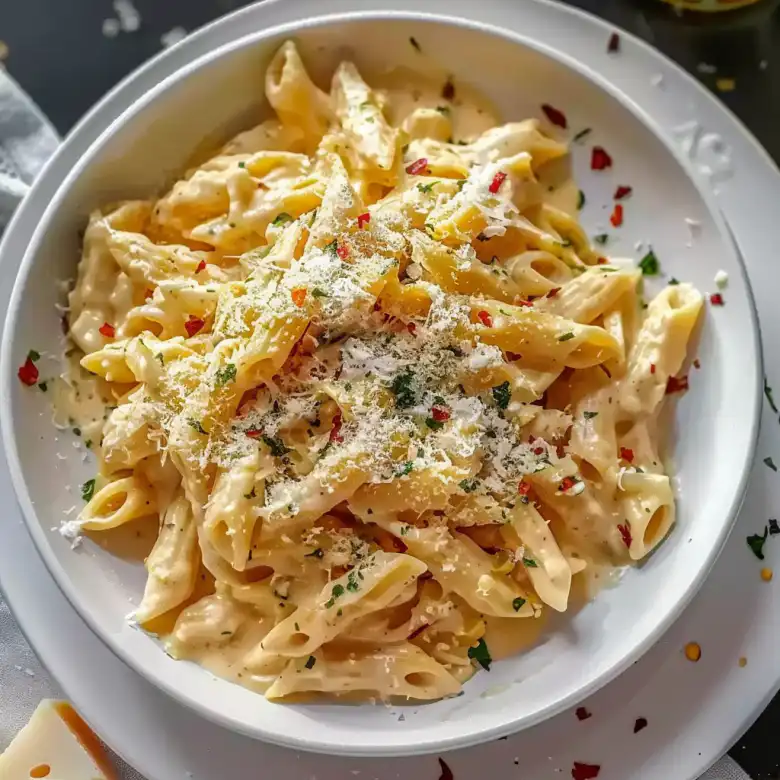
This one-pot creamy garlic pasta is a weeknight lifesaver. It delivers maximum flavor with minimal fuss, making it a go-to for busy evenings. You get all the comfort of a rich, garlicky pasta dish without the mountain of dishes to wash.
Why This One Pot Creamy Garlic Pasta Works
The beauty of this dish lies in its simplicity and flavor concentration. Cooking everything together in one pot allows the pasta to absorb the savory liquid, infusing it with garlic and creamy notes. This method essentially creates a built-in sauce, reducing cooking time and dirty dishes significantly. It’s a straightforward approach that yields pleasingly rich results every time.
Ingredients
* 1 tablespoon olive oil
* 1 small yellow onion, finely chopped
* 4 cloves garlic, minced
* 1 ½ cups uncooked fettuccine or linguine (or your favorite long pasta)
* 3 cups low-sodium chicken or vegetable broth
* 1 cup milk (whole or 2%)
* ½ cup grated Parmesan cheese, plus more for serving
* 2 tablespoons unsalted butter
* ½ teaspoon salt, or to taste
* ¼ teaspoon black pepper, or to taste
* Optional garnishes: fresh parsley, red pepper flakes
Gathering these simple ingredients is the first step to enjoying this satisfying meal.
How to Make It
1. Sauté Aromatics: Heat the olive oil in a large, deep skillet or Dutch oven over medium heat. Add the finely chopped onion and cook, stirring occasionally, until softened and translucent, about 5-7 minutes. This initial sauté builds a foundational layer of flavor. Properly softening the onion releases its natural sugars, contributing a subtle sweetness and depth that wouldn’t be present if added raw. This step is crucial for developing the savory base of the dish, ensuring that the onion flavor is mellow and well-integrated, rather than sharp or overpowering. It also creates a welcoming aroma that signals the start of a delicious meal.
2. Add Garlic: Stir in the minced garlic and cook for another minute until fragrant. Be careful not to burn the garlic, as this can impart a bitter taste. Garlic is potent and cooks very quickly. Its primary role here is to infuse the oil and the developing sauce with its signature pungent and aromatic qualities. Cooking it for a brief period allows these flavors to bloom without turning the garlic brown, which would introduce bitterness. The aroma of sautéing garlic is a key indicator that the dish is progressing well and developing its characteristic flavor profile.
3. Incorporate Pasta and Liquids: Add the uncooked pasta to the skillet. Pour in the chicken or vegetable broth and milk. Stir to ensure the pasta is submerged in the liquid. This is where the one-pot magic truly begins. By adding the dry pasta directly to the skillet, it will cook and absorb the liquid, releasing its starches. These starches are essential; they naturally thicken the broth and milk mixture into a creamy sauce as the pasta cooks. Ensuring the pasta is fully submerged is critical for even cooking, preventing any brittle, undercooked strands. The combination of broth and milk provides a balanced liquid base that is flavorful yet creamy.
4. Season: Add the salt and black pepper. Stir everything together well to distribute the seasonings. Seasoning at this stage is important to build flavor from the start. The salt will help to draw out moisture from the ingredients and enhance the overall taste. Black pepper adds a subtle warmth and complexity. It’s important to season moderately at this point, as the flavor will concentrate as the liquid reduces and the cheese, which is also salty, will be added later.
5. Simmer and Stir: Bring the liquid to a simmer. Once simmering, reduce the heat to medium-low, cover the skillet, and cook for 10-12 minutes, or until the pasta is almost al dente. It’s important to stir occasionally, about every 3-4 minutes, to prevent the pasta from sticking to the bottom of the pan and to ensure even cooking. You’ll notice the liquid will start to thicken as the pasta releases its starch. This simmering phase is where the pasta cooks and the sauce begins to form. Covering the pan traps steam, which helps the pasta cook evenly and efficiently while also allowing the starches to begin their thickening work. The occasional stirring is paramount; it prevents the pasta from clumping together or adhering to the hot pan, ensuring each strand cooks to perfection. As the pasta absorbs the liquid and releases starches, the liquid will visibly change in consistency, moving from thin to slightly viscous.
6. Add Creaminess: Uncover the skillet. Stir in the grated Parmesan cheese and butter. Continue to stir gently as the cheese melts and the butter incorporates, creating a creamy sauce. Cook for another 2-3 minutes, uncovered, until the pasta is cooked through and the sauce has reached your desired consistency. If the sauce seems too thick, you can add a splash more milk or broth. If it’s too thin, continue to cook for a minute or two more, stirring, allowing some of the liquid to evaporate. This is the culminating step that transforms the dish into a rich, creamy pasta. The heat from the cooked pasta and remaining liquid efficiently melts the grated Parmesan cheese and butter, emulsifying them into a luscious sauce. Stirring continuously ensures that the cheese is fully incorporated without clumping and that the butter adds gloss and richness. The final few minutes of cooking allow the sauce to thicken to the desired consistency and the pasta to reach its perfect al dente texture.
7. Adjust and Serve: Taste and adjust seasoning with additional salt and pepper if needed. Serve immediately. This final tasting is crucial. As ingredients meld and flavors concentrate, the initial seasoning might need slight adjustments. This ensures that the final dish is perfectly balanced to your palate. Serving immediately is key to enjoying the pasta at its best, when the sauce is still luscious and the pasta has the ideal texture.
This simple, step-by-step process transforms basic pantry staples into a comforting and flavorful meal in under 30 minutes.
Check this out: Creamy Garlic Pasta in One Pot
Nutrition at a Glance
* Calories: Approximately 450-550 per serving, depending on milk fat content and portion size. This range reflects the contribution of pasta, oils, and dairy.
* Protein: Around 18-22g, primarily from pasta and Parmesan cheese. This is a good source of protein for a pasta dish, making it relatively satisfying.
* Fat: Roughly 20-28g, influenced by olive oil, butter, milk, and cheese. This accounts for the richness and creamy texture of the sauce.
* Carbohydrates: Approximately 50-60g, with the majority from the pasta. This provides the energy base for the meal.
* Fiber: Generally low, around 2-4g, depending on the type of pasta used. Refined pasta typically has less fiber than whole wheat varieties.
* Sodium: Variable, typically 500-800mg, heavily influenced by the broth and added salt. Using low-sodium broth and controlling added salt can help manage sodium intake.
These are approximate values and can fluctuate based on specific ingredients and serving sizes. It’s always a good idea to check the nutrition labels of your specific ingredients for the most accurate information.

How to Serve It
* Serve hot, immediately after cooking, for the best creamy texture. The sauce is most fluid and beautifully coats the pasta when fresh from the heat. Letting it sit for too long can cause it to thicken considerably.
* Garnish generously with freshly chopped parsley for a hit of freshness and color. Parsley not only adds visual appeal but also introduces a bright, herbaceous note that cuts through the richness of the garlic cream sauce.
* A sprinkle of red pepper flakes can add a pleasant warmth and hint of spice. For those who enjoy a little heat, a pinch of red pepper flakes offers a subtle complexity that complements the savory garlic and creamy sauce.
* Offer extra grated Parmesan cheese at the table for those who enjoy a little more richness. This allows individuals to customize the cheesiness to their own preference and adds a salty, umami boost.
This dish is wonderfully satisfying on its own, but these simple additions can elevate its presentation and flavor profile.
Common Mistakes
* Not stirring enough: This is the most common pitfall. Skipping stirs can lead to pasta sticking to the bottom of the pan, creating burnt bits and unevenly cooked pasta. Make sure to stir every 3-4 minutes during the simmering process. The starch from the pasta can cause it to adhere to the pan’s surface if not agitated regularly, leading to both texture issues and potential burnt flavors.
* Overcooking the pasta: Since the pasta continues to cook in the sauce even after you turn off the heat, it’s best to aim for slightly al dente when you add the cheese and butter. The residual heat will finish the job and prevent mushy pasta. The goal is for the pasta to have a slight bite remaining when it’s removed from the heat, as it will soften further in the hot sauce.
* Burning the garlic: Garlic burns quickly and becomes bitter. Add it after the onions have softened and cook just until fragrant, not browned. This means a quick 60 seconds is usually plenty. Burnt garlic can ruin the entire dish, introducing an unpleasant acrid note that is difficult to mask.
* Using too much liquid initially: While it seems counterintuitive, starting with too much liquid can result in a watery sauce that takes longer to reduce. The listed amounts are generally balanced for effective starch release and sauce development, aiming for a sauce that is both creamy and adheres well to the pasta.
* Adding cheese too early: Stirring in the Parmesan and butter at the end, once the liquid has reduced slightly, ensures a smoother, creamier sauce rather than a clumpy or oily one. Adding the cheese when the liquid is still too thin can prevent it from melting properly, leading to a less cohesive sauce.
Being mindful of these common errors will help ensure a delicious result every time you make this pasta.
Storage and Reheating
* Storage: Allow the pasta to cool completely before transferring it to an airtight container. Store in the refrigerator for up to 3-4 days. It’s important to let it cool fully to prevent steam from creating condensation, which can make it mushy. Rapid cooling helps maintain texture.
* Reheating: Reheat gently on the stovetop over low heat, stirring frequently, with a splash of milk or broth to loosen the sauce. You can also reheat it in the microwave in short intervals, stirring between each, until heated through. Avoid high heat, as this can cause the sauce to break and the pasta to become gummy. The gentle approach ensures the sauce remains emulsified and the pasta retains some of its desired texture rather than becoming overly soft or breaking down.
Proper storage and reheating are key to enjoying leftovers without sacrificing quality.
Leftover Ideas
* Pasta Salad Base: Once completely cooled, toss the leftover pasta with chopped vegetables like cherry tomatoes, cucumber, and bell peppers. A simple vinaigrette can transform it into a cold pasta salad. The creamy garlic base acts as a flavorful dressing component.
* Topped with Protein: Reheat the pasta and serve it topped with grilled chicken, shrimp, or pan-seared salmon for a complete meal. The added protein makes it a more substantial and balanced dish.
* Baked Pasta Dish: Layer the reheated pasta in a small baking dish with a little extra sauce or marinara, top with breadcrumbs and more cheese, and bake until golden and bubbly. This gives the leftovers a delightful crispy topping and a re-imagined texture.
* Stuffed Peppers: Mix the leftover pasta with some cooked ground meat or vegetables, stuff into pre-cooked bell pepper halves, and bake until tender. This utilizes the pasta as a hearty filling component for another meal.
Leftovers can be a starting point for entirely new and exciting meals.
This recipe for One Pot Creamy Garlic Pasta is more than just a quick meal; it’s a testament to how simple ingredients and a practical cooking method can deliver deeply satisfying flavors. It’s the kind of dish that becomes a reliable standby, the one you reach for when time is short but you crave something comforting and delicious. The magic of cooking everything in a single pot is twofold: it dramatically cuts down on cleanup, and more importantly, it allows the pasta to absorb all the wonderful flavors of the garlic, broth, and milk as it cooks, creating a luscious, integrated sauce right in the pan.
PrintOne Pot Creamy Garlic Pasta
- Total Time: 30 minutes
- Yield: 4 servings 1x
Description
A quick and easy one pot creamy garlic pasta recipe that’s perfect for weeknight dinners. Minimal cleanup, maximum flavor!
Ingredients
- 1 tablespoon olive oil
- 1 small yellow onion, finely chopped
- 4 cloves garlic, minced
- 1 ½ cups uncooked fettuccine or linguine
- 3 cups low-sodium chicken or vegetable broth
- 1 cup milk (whole or 2%)
- ½ cup grated Parmesan cheese, plus more for serving
- 2 tablespoons unsalted butter
- ½ teaspoon salt, or to taste
- ¼ teaspoon black pepper, or to taste
- Optional garnishes: fresh parsley, red pepper flakes
Instructions
- 1. Heat the olive oil in a large, deep skillet or Dutch oven over medium heat. Add the finely chopped onion and cook, stirring occasionally, until softened and translucent, about 5-7 minutes.
- 2. Stir in the minced garlic and cook for another minute until fragrant. Be careful not to burn the garlic.
- 3. Add the uncooked pasta to the skillet. Pour in the chicken or vegetable broth and milk. Stir to ensure the pasta is submerged in the liquid.
- 4. Add the salt and black pepper. Stir everything together well.
- 5. Bring the liquid to a simmer. Once simmering, reduce the heat to medium-low, cover the skillet, and cook for 10-12 minutes, or until the pasta is almost al dente. Stir occasionally, about every 3-4 minutes.
- 6. Uncover the skillet. Stir in the grated Parmesan cheese and butter. Continue to stir gently as the cheese melts and the butter incorporates, creating a creamy sauce. Cook for another 2-3 minutes, uncovered, until the pasta is cooked through and the sauce has reached your desired consistency.
- 7. Taste and adjust seasoning with additional salt and pepper if needed. Serve immediately.
Notes
Store leftovers in an airtight container in the refrigerator for up to 3-4 days. Reheat gently on the stovetop with a splash of milk or broth, or in the microwave in short intervals.
- Prep Time: 10 minutes
- Cook Time: 20 minutes
- Category: Main Course
- Method: Stovetop
- Cuisine: American
Nutrition
- Serving Size: 1 serving
- Calories: 490
- Sugar: 5g
- Sodium: 650mg
- Fat: 24g
- Carbohydrates: 55g
- Fiber: 3g
- Protein: 20g