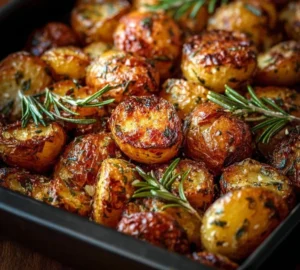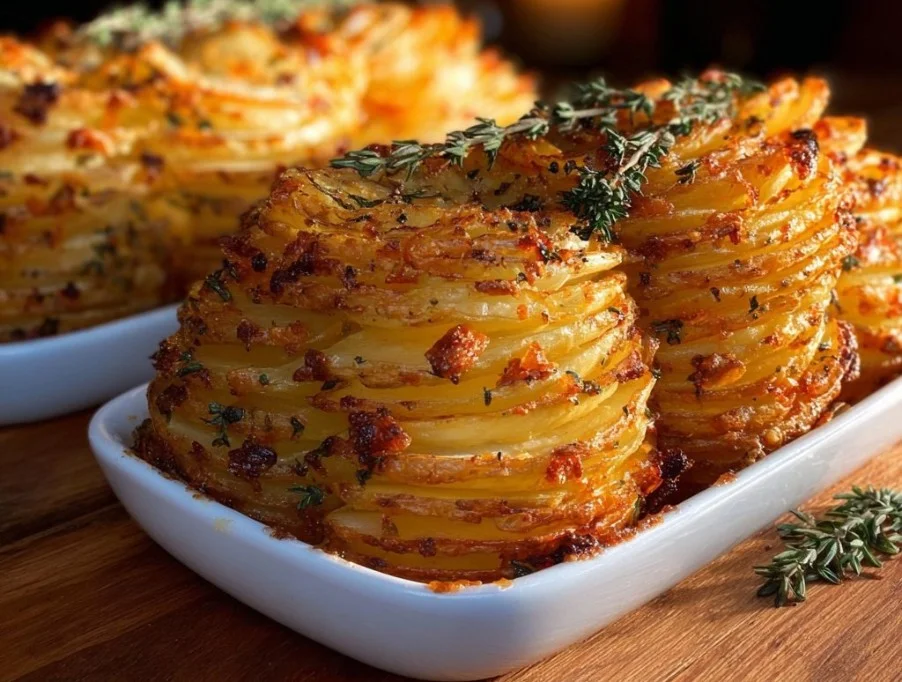
Crispy Potato Roast cooks into tightly packed layers with golden, crisp edges while the inside stays tender and buttery. I keep it in regular rotation because the slow roast develops deep flavor without complicated steps. It pairs especially well with hearty mains like my beef and potato skillet recipe, making weeknight dinners easier to complete.
Print
Crispy Potato Roast
- Total Time: 90 minutes
- Yield: 8 servings 1x
- Diet: Vegetarian
Description
A technique-driven layered potato roast with crispy edges and tender buttery centers, perfect as a substantial side or vegetarian centerpiece.
Ingredients
- 3–4 lbs Yukon Gold Potatoes
- 1/2 cup unsalted butter, melted
- 2 tbsp olive oil
- 4 cloves garlic, minced
- 2 tsp fresh thyme, leaves stripped and roughly chopped
- Salt and pepper to taste
Instructions
- Preheat the oven to 375°F (190°C) and place a rack in the middle position.
- Wash and peel the potatoes, then slice them thin and even, about 1/8-inch thick, using a mandoline for best results.
- In a small bowl, combine the melted butter, olive oil, minced garlic, fresh thyme, and a pinch of salt and pepper, whisking until blended.
- Lightly oil a 9×13-inch baking dish, then arrange the potato slices upright, standing them on their edges in tight rows.
- Brush a generous amount of the butter and oil mixture over the exposed potato edges, ensuring the garlic and thyme get distributed between the slices.
- Continue layering and brushing until the dish is full, reserving a few tablespoons of the butter mix to finish the top.
- Cover the dish tightly with aluminum foil and bake for 45 minutes.
- Remove the foil, brush the remaining butter mixture over the top, and increase the oven temperature to 425°F (220°C).
- Roast for another 25 to 35 minutes, checking at 25 minutes for a golden, crisp top and tender centers when pierced with a knife.
- Let the potatoes rest for 10 minutes before serving.
Notes
Refrigerate leftovers in an airtight container for up to 4 days. For best texture, reheat single portions in a 350°F oven for 10 to 15 minutes or in a skillet over medium heat with a teaspoon of oil. The roast freezes well for up to 3 months.
- Prep Time: 20 minutes
- Cook Time: 70 minutes
- Category: Side Dish
- Method: Baking
- Cuisine: American
Nutrition
- Serving Size: 1 serving
- Calories: 320
- Sugar: 1g
- Sodium: 320mg
- Fat: 13g
- Saturated Fat: 8g
- Unsaturated Fat: 4g
- Trans Fat: 0g
- Carbohydrates: 35g
- Fiber: 4.5g
- Protein: 4g
- Cholesterol: 30mg
Why This Is a Go-To in My Kitchen
This recipe is reliable because it focuses on technique not tricks, and it rewards patience with a thousand-layer look, crisp edges, and tender centers. Expect minimal hands-on time, pantry-friendly ingredients, and a result that travels well from the oven to the table. You can trust the process to produce even slices that steam, then roast, so each bite has texture and depth.
Ingredient Lineup
- 3–4 lbs Yukon Gold Potatoes
- 1/2 cup unsalted butter, melted
- 2 tbsp olive oil
- 4 cloves garlic, minced
- 2 tsp fresh thyme, leaves stripped and roughly chopped
- Salt and pepper to taste
How It Comes Together
- Preheat your oven to 375°F (190°C), and place a rack in the middle position.
- Wash and peel the potatoes, then slice them thin and even, about 1/8-inch thick, using a mandoline for best results.
- In a small bowl, combine the melted butter, olive oil, minced garlic, fresh thyme, and a pinch of salt and pepper, whisking until blended.
- Lightly oil a 9×13-inch baking dish, then arrange the potato slices upright, standing them on their edges in rows so they form tight layers and expose their edges.
- Brush a generous amount of the butter and oil mixture over the exposed potato edges, making sure the garlic and thyme get distributed between the slices.
- Continue layering and brushing until the dish is full, reserving a few tablespoons of the butter mix to finish the top.
- Cover the dish tightly with aluminum foil and bake for 45 minutes, this will gently steam the potatoes and help them become tender without drying out.
- Remove the foil, brush the remaining butter mixture over the top, and increase the oven temperature to 425°F (220°C).
- Roast for another 25 to 35 minutes, checking at 25 minutes for a golden, crisp top and tender centers when pierced with a knife.
- Let the potatoes rest for 10 minutes before serving, this helps the layers settle and makes serving cleaner.
A Look at the Nourishing Side
- Serves 8, about 320 calories per serving, roughly 4 grams protein, 35 grams carbohydrates, 13 grams fat, 4.5 grams fiber, and approximately 320 mg sodium per serving, depending on how much salt you add.
How This Recipe Shows Up at Mealtime
- This roast is comfort food that works as a substantial side or a vegetarian centerpiece, and it pairs beautifully with simply seared steaks, roasted chicken, or a green salad. For a cozy Sunday dinner, serve alongside roasted root vegetables and a crisp white wine, or for weeknights keep it simple with grilled sausages and steamed green beans; if you prefer a meaty pairing, the beef and potatoes skillet is a solid choice.
Storing and Reheating Without Ruining It
- Refrigerate leftovers in an airtight container for up to 4 days, and reheat single portions in a 350°F oven for 10 to 15 minutes to revive the crisp edges, or reheat in a skillet over medium heat with a teaspoon of oil for best texture; the roast freezes well for up to 3 months if wrapped tightly in foil and stored in a freezer-safe container, and thaw overnight in the fridge before reheating.
- Freshness tip, keep the top covered with a single sheet of parchment before sealing the container to help prevent sogginess.
Tips I’ve Learned the Hard Way
- Use even slices: A mandoline gives consistent 1/8-inch slices, and consistency is what keeps the layers cooking uniformly.
- Don’t skimp on the butter: The butter and oil are your flavor and crispness agents, use the full amount for the best edges and golden top.
- Reserve a finishing brush: Putting a little of the butter mixture on top after steaming, before the high-heat roast, makes the difference between browned and beautifully caramelized.
- Rest before slicing: Letting the dish rest 10 minutes helps the layers settle so slices hold together without collapsing.
Ways to Change It Without Breaking It
- Seasonal: Add thin slices of sweet potato interleaved with Yukon golds in autumn for a colorful seasonal twist.
- Comfort-focused: Sprinkle 1/2 cup grated sharp cheddar over the top during the last 10 minutes of roasting for melty, indulgent goodness.
- Slightly elevated: Fold in a tablespoon of truffle oil to the finishing butter or sprinkle grated Pecorino Romano on top after roasting for a restaurant-style finish.
What Can Go Wrong and How to Fix It
- Problem, slices cook unevenly because some are thicker; Fix, re-slice thicker pieces and use a mandoline for consistent thickness so every layer finishes at the same time.
- Problem, top burns before centers are tender; Fix, make sure you covered the dish and baked at 375°F long enough to steam the potatoes fully, then finish at higher heat for browning only.
- Problem, the roast is soggy; Fix, uncover for longer at 425°F and allow steam to escape, and do not over-cover the dish for the final roast stage.
- Problem, bland flavor; Fix, increase the garlic and thyme slightly and finish with flaky sea salt to brighten flavors right before serving.
Turning Leftovers Into Something New
- Breakfast hash, chop leftover slices into cubes and pan-fry with diced onion and bell pepper, add an egg on top for a quick hearty breakfast.
- Twice-baked inspired skillet, crumble leftovers into a skillet, top with an egg and a handful of cheese, and bake until the egg is set for an easy single-pan meal.
- Potato sandwich, layer slices with roasted vegetables and a smear of mustard or aioli between bread for a comforting lunch.
Questions Readers Often Ask
How thin do the potato slices need to be for this to work?
About 1/8-inch thick is ideal, and a mandoline makes this fast and consistent. Thinner slices cook faster and layer more compactly, while thicker slices need longer steaming time and can lead to uneven texture.
Can I use russet or red potatoes instead of Yukon Gold?
Yes, but expect differences, russets are starchier and can break apart more easily, while red potatoes hold shape with a firmer bite; Yukon Gold hits the balance of creaminess and structure that makes the layers sing.
Do I need to peel the potatoes every time?
Peeling gives a refined look and softer mouthfeel, but leaving the skins on saves time and adds texture, plus nutrients and fiber; choose based on your preference and how smooth you want the finished slice.
Can I make this ahead for a party?
Absolutely, you can assemble and cover it, then keep it refrigerated for up to 24 hours before baking; add an extra 10 minutes to the baking time if starting from cold.