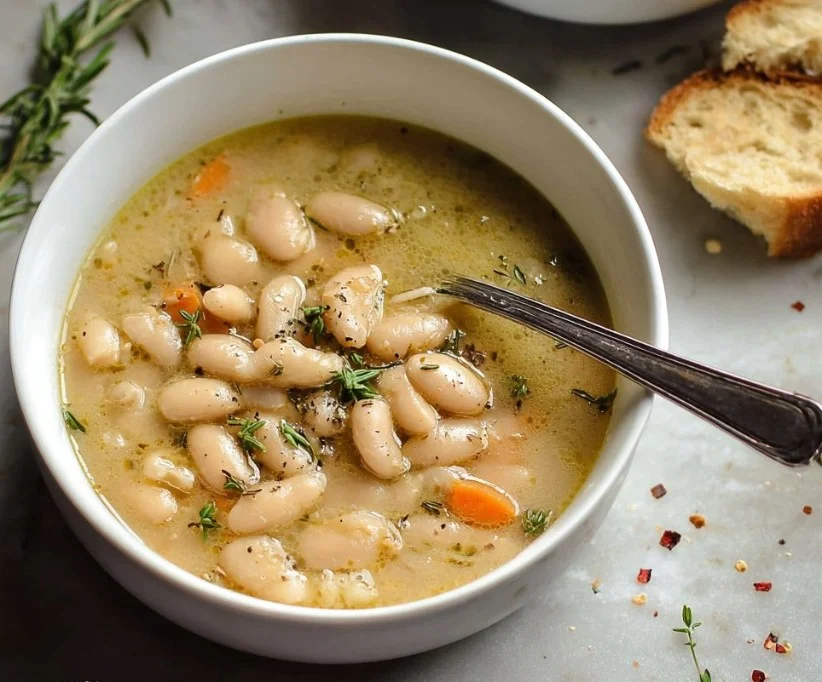
The evening sun dipped low, casting a warm glow on the kitchen as I stirred a pot of soup that promised to warm both stomachs and souls. This Rosemary Garlic White Bean Soup SOUP packs a protein punch with roughly 15 grams per serving, making it a delightful companion for chilly nights. Picture the aroma of roasted garlic mingling with herbal notes as you prepare dinner—the kind of scene that invites everyone to the table.
Why This Rosemary Garlic White Bean Soup Never Fails
Sometimes, a hug in a bowl is just what you need, and that’s precisely what this soup delivers. It’s effortless to whip up and requires minimal ingredients—perfect for those busy weeknights or last-minute gatherings. The balance of creaminess from the cannellini beans and the fragrant touch of rosemary makes it a guaranteed crowd-pleaser, whether you’re serving family or friends. Let’s not forget, anyone can master this recipe, leaving you plenty of time to focus on what matters most—enjoying great company.
The Essentials
- 2 Tbsp olive oil
- 4 cloves garlic, minced
- 3 (15 oz.) cans cannellini beans, divided
- 2 cups vegetable or chicken broth
- 1/2 tsp dried rosemary
- 1/4 tsp dried thyme
- 1 pinch crushed red pepper
- Freshly cracked black pepper to taste
Let’s Cook
- Pour one of the cans of cannellini beans (with its liquid) into a blender and purée until smooth. Drain the other two cans of beans. A smooth purée will create that comforting creaminess you’re after.
- Mince the garlic and add it to a soup pot with the olive oil. Sauté the garlic over medium heat for about one minute, or just until fragrant. Keep an eye on it; you want it golden but not browned!
- Add the puréed cannellini beans, the other two drained beans, broth, rosemary, thyme, crushed red pepper, and cracked black pepper. Stir to combine. The beans add bulk and nutrition, so get that mix well blended!
- Cover the pot, increase heat to medium-high, and bring the soup to a boil. Once boiling, reduce heat to medium-low, remove the lid, and simmer for 15 minutes, stirring occasionally. This helps the flavors develop beautifully.
- Smash the beans slightly to thicken the soup. Taste and add salt if needed. Serve hot with crusty bread for dipping. Nothing pairs better for sopping up all that deliciousness.
Nutrition Breakdown
Each serving provides about 320 calories, 15 grams of protein, 40 grams of carbohydrates, 10 grams of fat, and a respectable 8 grams of fiber. With beans as the star ingredient, you’re not just feeding your belly but also applauding healthy digestion. Plus, the protein content makes this soup satisfying enough for a light dinner on its own.
How to Serve It Best
Serve this Rosemary Garlic White Bean Soup hot, garnished with a sprinkle of fresh herbs or a drizzle of olive oil for an Italian touch. Pair it with crusty baguette or tree-hugging artisan bread on the side for dipping. It shines in the fall and winter months, offering that warm, cozy feeling no one can resist. Set the mood with a few candles, and you’ll have a perfect dinner scene, ready for laughter and conversation.
Print
Easy Rosemary Garlic White Bean Soup
- Total Time: 35 minutes
- Yield: 4 servings 1x
- Diet: Vegetarian
Description
A comforting soup with cannellini beans, garlic, and rosemary, perfect for chilly nights.
Ingredients
- 2 Tbsp olive oil
- 4 cloves garlic, minced
- 3 (15 oz.) cans cannellini beans, divided
- 2 cups vegetable or chicken broth
- 1/2 tsp dried rosemary
- 1/4 tsp dried thyme
- 1 pinch crushed red pepper
- Freshly cracked black pepper to taste
Instructions
- Pour one can of cannellini beans (with liquid) into a blender and purée until smooth. Drain the other two cans of beans.
- Mince the garlic and sauté in olive oil over medium heat for about one minute, until fragrant.
- Add the puréed beans, drained beans, broth, rosemary, thyme, crushed red pepper, and cracked black pepper into the pot and stir to combine.
- Cover and increase heat to medium-high, bringing the soup to a boil.
- Once boiling, reduce heat to medium-low, remove the lid, and simmer for 15 minutes, stirring occasionally.
- Smash some beans slightly to thicken the soup. Taste and adjust salt if needed. Serve hot with crusty bread.
Notes
Reheat gently on the stove, adding broth if too thick. Can be frozen for up to three months.
- Prep Time: 10 minutes
- Cook Time: 25 minutes
- Category: Soup
- Method: Stovetop
- Cuisine: Italian
Nutrition
- Serving Size: 1 serving
- Calories: 320
- Sugar: 1g
- Sodium: 600mg
- Fat: 10g
- Saturated Fat: 1g
- Unsaturated Fat: 8g
- Trans Fat: 0g
- Carbohydrates: 40g
- Fiber: 8g
- Protein: 15g
- Cholesterol: 0mg
How to Store It Right
Fridge: Store any leftovers in an airtight container for up to five days.
Freezer: For longer storage, this soup freezes beautifully—freeze in freezer-safe containers for up to three months.
Reheat: Warm gently on the stove over low heat, adding a splash of broth if it’s too thick, or microwave in 30-second increments until heated through. One freshness tip? Stir in a dash of olive oil or fresh herbs just before serving to rejuvenate the flavors.
Pro Tips
- Texture Game: For added texture, reserve some whole beans and stir them in just before serving.
- Flavor Amplification: Experiment with a splash of lemon juice for brightness or a sprinkling of smoked paprika for a bit of a kick.
- Fresh Herb Drizzle: Top each bowl with a drizzle of pesto or a sprinkle of fresh parsley for an appealing presentation.
- Make It Creamy: For a richer soup, add a splash of cream or a dollop of sour cream right before serving.
- One-Pot Wonder: To minimize dishes, you can sauté in the same pot you’ll use to simmer the soup.
Flavor Experiments
- Seasonal Twist: Add in some roasted butternut squash cubes for a hearty autumn twist.
- Gourmet Upgrade: Elevate the recipe with sautéed mushrooms and a swirl of truffle oil for an elegant dinner party treat.
- Playful Variation: Stir in a handful of spinach or kale for a fresh flair, brightening up the flavor and adding nutrients without losing the essence of the soup.
Learn from My Mistakes
- Overcooking garlic can turn it bitter. Always sauté until just fragrant.
- Not using enough salt? Beans can be bland without seasoning, so taste and adjust as necessary.
- If your soup is too thick, add a little more broth or water to reach your desired consistency.
- Making it ahead? Don’t add in acidic ingredients (like lemon juice) until just before serving, or it can alter texture and flavor.
- Over-puréed beans can lead to a gluey texture. Leave some chunks for a heartier bite.
Creative Second-Day Ideas
Transform any leftover EASY ROSEMARY GARLIC WHITE BEAN SOUP into a delicious pasta sauce—just heat it and toss in your choice of cooked pasta. Or for a quick lunch, blend it with some vegetable stock for a smooth dip, perfect for pairing with fresh veggies. Finally, consider using it as a filling in savory crepes, adding cheese and greens for an impressive and delightful dish.
Quick Questions
Can I use dried beans instead of canned? Absolutely! Soak and cook the dried beans until tender, then follow the recipe as usual. Just remember to adjust cooking times!
How long does this soup last in the fridge? It will stay fresh for up to five days in a tightly sealed container. Heat it up as needed!
Is the soup vegetarian-friendly? Yes, simply use vegetable broth instead of chicken broth for a delightful vegan option.
Can I freeze leftover soup? Yes! Freeze in airtight containers for up to three months for an easy future meal option.