On weeknights when time is short and appetites are big, John Wayne Casserole slides into the rotation like a reliable old friend. It solves the dinner scramble with hearty ground beef, melty cheese, and a biscuit crust that adds comforting carbs while supplying a decent hit of protein and iron. The top gets golden and a little crisp while the inside stays creamy and savory, exactly what I want after a busy day. If you like family-style casseroles, I often pair it with a lighter salad or another favorite like my cheesy sausage casserole for nights when I need options.
Print
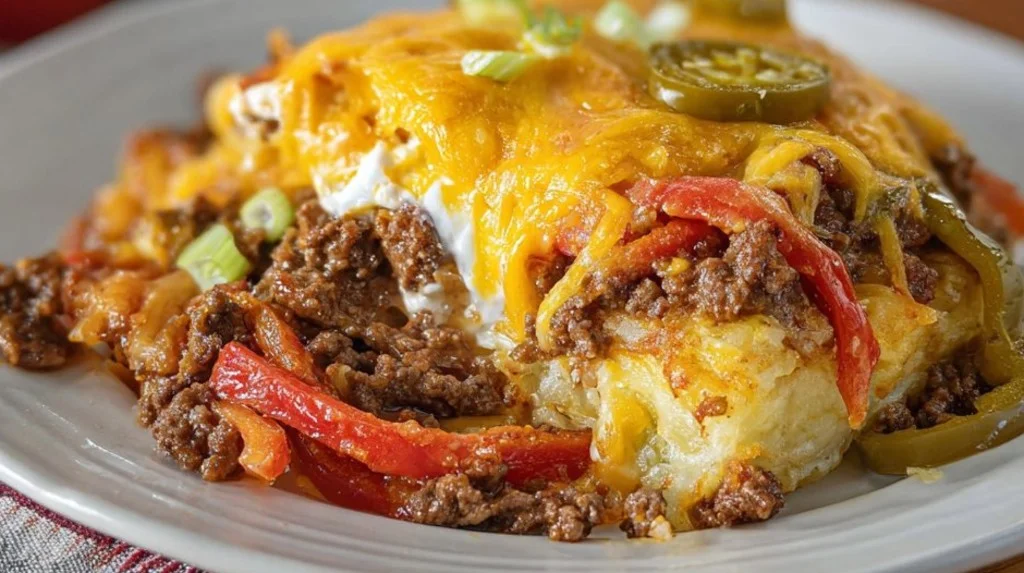
John Wayne Casserole
- Total Time: 1 hour
- Yield: 6 servings 1x
- Diet: None
Description
A hearty casserole with seasoned ground beef, cheese, and a comforting biscuit crust that is perfect for busy weeknights.
Ingredients
- 2 pounds ground beef (browned and drained)
- 1 ounce packet taco seasoning
- 16 ounce can large biscuits
- 1/2 cup sour cream
- 1/2 cup mayonnaise
- 8 ounces cheddar cheese (shredded and divided)
- 1 medium onion (halved and sliced)
- 2 medium tomatoes (sliced)
- 1 medium red bell pepper (halved and sliced)
- 4 ounces canned sliced jalapeño peppers (optional)
- Salt and black pepper to taste
- 1 tablespoon vegetable oil
- Chopped cilantro or green onion for garnish (optional)
Instructions
- Preheat oven to 350°F and prepare a 13×9 glass baking dish with nonstick spray.
- Arrange biscuits in the pan and press to form a crust.
- Bake the biscuit crust for 12 to 15 minutes until light brown.
- In a skillet, heat vegetable oil and sauté onions until translucent.
- Add ground beef and brown, draining excess fat.
- Stir in taco seasoning and water, simmer until reduced.
- In a bowl, mix sour cream, mayonnaise, half of the cheddar, and reserved onions.
- Sauté remaining onions with red bell pepper until softened.
- Layer the casserole: beef, tomatoes, onion and pepper mixture, jalapeños, sour cream mixture, and top with remaining cheddar.
- Bake uncovered for 30 to 40 minutes until edges are browned and cheese is bubbling.
- Let rest for 8 to 10 minutes before slicing.
Notes
For best results, let the casserole cool slightly before serving. Can be paired with a salad for a lighter meal.
- Prep Time: 20 minutes
- Cook Time: 42 minutes
- Category: Main Course
- Method: Baking
- Cuisine: American
Nutrition
- Serving Size: 1 serving
- Calories: 540
- Sugar: 5g
- Sodium: 900mg
- Fat: 28g
- Saturated Fat: 10g
- Unsaturated Fat: 12g
- Trans Fat: 0g
- Carbohydrates: 36g
- Fiber: 2.5g
- Protein: 32g
- Cholesterol: 85mg
Why This Is a Go-To in My Kitchen
This recipe is straightforward, feeds a crowd, and cleans up easily. Expect layers of seasoned beef, a tangy cream mixture, fresh vegetables, and a quick biscuit base that bakes into a tender edge. It requires no fancy equipment, and the results are predictable in the best way: comforting, satisfying, and kid-approved. Make it once and you’ll find reasons to make it again.
What You’ll Need
- 2 pounds ground beef (browned and drained) — lean 85/15 keeps it juicy without too much grease.
- 1 ounce packet taco seasoning plus water listed on the back or my homemade taco seasoning — gives familiar Tex-Mex flavor, swap to taste.
- 16 ounce can large biscuits — the pre-made biscuits press into a quick crust with minimal fuss.
- 1/2 cup sour cream — adds tang and creaminess to the layer.
- 1/2 cup mayonnaise — helps the filling set and keeps it rich.
- 8 ounces cheddar cheese (shredded and divided) — sharp cheddar brings flavor; reserve half for melting and half for mixing.
- 1 medium onion (halved and sliced) — sautéed until soft for sweetness and structure.
- 2 medium tomatoes (sliced) — fresh acidity and color on top.
- 1 medium red bell pepper (halved and sliced) — mild sweetness and crunch when sautéed briefly.
- 4 ounces canned sliced Jalapeno peppers — optional, for a bright, spicy pop.
- Salt and black pepper to taste — small adjustments make a big difference.
- 1 tablespoon vegetable oil — for sautéing the onion and pepper.
- Optional: chopped cilantro or green onion for garnish — brightens the finished dish.
How It Comes Together
- Preheat oven to 350 F and place your oven rack in the center of the oven, then spray a 13×9 glass baking dish with nonstick spray (this ensures even heat and easy release).
- Arrange the 16 ounce can of large biscuits in a single layer in the prepared pan and press them together so the seams meet, pressing dough halfway up the sides of the pan to form a crust (aim for an even thickness; thinner edges brown faster).
- Place the baking dish on a baking sheet and bake the pressed biscuit crust in the preheated oven for 12 to 15 minutes, starting to check at 12 minutes; the dough should be very light brown where the edges just start to color, then remove and set aside with the oven still on (the pan is easier to handle on a baking sheet).
- While the crust bakes, heat 1 tablespoon vegetable oil in a large skillet over medium-high heat and add the halved and sliced onion, sautéing until translucent, about 4 minutes (work until softened but not browned for a sweeter flavor).
- Add 2 pounds of ground beef to the skillet with the onions and brown, breaking it into small pieces; drain excess fat and return meat to pan (browning well develops deep flavor).
- Stir in the 1 ounce taco seasoning packet plus water as directed or 2 tablespoons of homemade taco seasoning with 1/4 cup water, simmer until sauce reduces slightly, about 2 minutes (seasoning should coat meat and smell fragrant).
- In a separate bowl, combine 1/2 cup sour cream, 1/2 cup mayonnaise, 4 ounces of the shredded cheddar cheese, and half of the sliced onions you reserved; stir well and set aside to let flavors mellow (texture will be creamy and spreadable).
- On the skillet, add the remaining half of the onions and the sliced red bell pepper and sauté with the meat just until peppers start to soften, about 3 minutes (you want tenderness but some bite).
- On top of the partially baked biscuit crust, layer in this order: spread an even layer of the taco-seasoned beef, add sliced tomato rounds, spoon the pepper and onion mixture over the tomatoes, scatter sliced jalapeno peppers to taste, spread the sour cream mixture evenly, and sprinkle with the remaining 4 ounces of shredded cheddar cheese (press gently to even everything out so it bakes uniformly).
- Bake uncovered in the preheated 350 F oven for 30 to 40 minutes, or until the edges of the dough are lightly browned and the cheese is fully melted and bubbling, then let rest 8 to 10 minutes before slicing (resting helps the layers set for cleaner slices).
How This Dish Fuels the Day
Each generous serving (about 1/6th of the casserole) delivers roughly 540 calories with approximately 32 grams of protein, 36 grams of carbohydrate, 28 grams of fat, 2.5 grams of fiber, and about 900 milligrams of sodium, depending on your exact ingredients. The protein and fat content make it filling and stabilizing for an evening meal, while the carbs from the biscuit crust provide quick energy for hungry families. For a lighter balance, add a big leafy salad or steamed vegetables to increase fiber and micronutrients at the plate.
When This Fits Best on the Table
This casserole shows up best for busy weeknight dinners, casual potlucks, or Sunday supper where everyone can serve themselves. Pair it with a simple chopped romaine salad tossed in lemon vinaigrette and some pickled jalapenos or sliced avocado for creaminess. If you want a heartier spread, roasted corn or steamed green beans with a squeeze of lime are straightforward sides that don’t compete with the casserole’s bold flavors.
Keeping It Fresh for Another Day
Store leftover casserole in an airtight container in the refrigerator for up to 3 to 4 days; reheat individual portions in the microwave for 90 to 120 seconds or in a 350 F oven for 10 to 15 minutes until warmed through. For longer storage, freeze portions tightly wrapped for up to 3 months; thaw overnight in the fridge before reheating to preserve texture. One freshness tip: transfer slices to a shallow, single-layer container to cool before refrigerating so the crust doesn’t trap steam and get soggy.
Small Details That Make a Big Difference
- Brown the beef in batches if your pan is crowded; crowded meat steams instead of browning and you lose depth of flavor.
- Let the casserole rest after baking; 8 to 10 minutes lets the filling set and makes slicing neater.
- If your biscuits brown too quickly, tent the pan loosely with foil midway through baking to prevent overcoloring while the center finishes.
- Taste and adjust salt only at the end; packaged taco seasoning and cheese already add sodium and you might not need more.
- Use a mix of sharp and mild cheddar for a balanced cheese flavor that melts well without becoming greasy.
Ways to Change It Without Breaking It
- Seasonal: Swap in roasted butternut squash slices and a sage sprinkle in fall for a slightly sweet, cozy twist that plays nicely with cheddar.
- Comfort-focused: Replace the tomato and jalapeno layer with a spread of creamed corn and extra cheese for a richer, stick-to-your-ribs version.
- Slightly elevated: Use a biscuit dough made from scratch with cold butter and a touch of garlic powder, and finish with a sprinkle of cotija and chopped cilantro for brightness.
Common Slip-Ups to Avoid
- Mistake: Pressing biscuits too thin so the crust burns. Fix: Keep an even thickness and bake on a sheet to monitor color; remove when edges just start to brown.
- Mistake: Overloading the pan with wet tomatoes that make the filling runny. Fix: Pat tomato slices dry and consider layering them on top of the meat, not directly on the biscuit.
- Mistake: Not draining excess fat from the beef leading to greasy casserole. Fix: Drain well or blot with paper towels before assembling.
- Mistake: Assembling while crust is too hot and causing the cream layer to separate. Fix: Let crust cool 3 to 4 minutes off the heat before layering the sour cream mixture.
- Mistake: Skipping the rest period after baking so slices fall apart. Fix: Allow an 8 to 10 minute rest for cleaner serving.
Turning Leftovers Into Something New
- Make handhelds: Reheat slices, shred the filling, warm tortillas, and fold the filling into quick tacos for lunch the next day.
- Casserole salad topper: Crisp leftover cubes of crust in a skillet and use warmed casserole pieces over a bed of mixed greens for a warm salad. Also try this idea when you want a different texture, inspired by casseroles like Greek feta spinach potato casserole transformations.
- Breakfast hash: Chop leftovers and sauté with an extra egg for a hearty breakfast skillet that repurposes everything with minimal effort.
FAQs From the Kitchen
Q: Can I make John Wayne Casserole ahead and bake it later?
A: Yes, assemble the casserole up to the point of baking, cover tightly, and refrigerate for up to 24 hours; add 5 to 10 extra minutes to baking time since it will be colder going into the oven. Let it rest before slicing.
Q: Can I use leftover cooked beef instead of browning fresh?
A: Absolutely. Use about the same quantity of pre-cooked seasoned beef, warm it gently with a splash of water or broth so it mixes easily, and reduce the skillet step to preserve texture.
Q: Is there a good vegetarian swap for this casserole?
A: Swap the beef for a mix of cooked lentils and chopped mushrooms seasoned like taco meat, or use a plant-based ground product; both provide texture and protein while keeping the assembly identical.
Q: How do I keep the crust from getting soggy under the filling?
A: Partially baking the pressed biscuit crust until it’s just starting to color creates a barrier. Also drain wet ingredients and let the assembled casserole rest so juices absorb evenly without soaking the base.
Conclusion
John Wayne Casserole is a dependable, comforting dish that works for weeknights, potlucks, and feeding a hungry family without fuss. If you want another take on this classic ground beef and biscuit style, check out this helpful writeup on John Wayne Casserole – a great ground beef option for inspiration and notes.