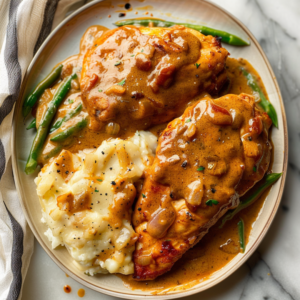
It’s a dish that’s become a regular in my kitchen rotation. Simple ingredients, minimal fuss, and always a crowd-pleaser. This Baked Ricotta Chicken offers a creamy, comforting meal without a lot of effort, perfect for busy weeknights.
Why This Baked Ricotta Chicken Works
This recipe shines because it transforms lean chicken breasts into something remarkably tender and flavorful. Ricotta cheese, when baked, creates a subtly sweet and creamy coating that melds beautifully with herbs and garlic. It’s a straightforward approach that delivers a satisfying, restaurant-worthy meal from your own oven.
Ingredients
- 4 boneless, skinless chicken breasts (about 6-8 ounces each)
- 1 cup whole milk ricotta cheese
- 1/4 cup grated Parmesan cheese
- 1 large egg
- 2 cloves garlic, minced
- 1 tablespoon chopped fresh parsley
- 1 teaspoon dried Italian seasoning
- 1/2 teaspoon salt
- 1/4 teaspoon black pepper
- 2 tablespoons olive oil
Here’s what you’ll need to gather for this delicious Baked Ricotta Chicken. I try to have these on hand as they are common pantry and refrigerator staples, making it easy to whip this up whenever the craving strikes. The beauty of this dish lies in its simplicity, allowing good quality ingredients to speak for themselves. Chicken breasts are a versatile foundation, and ricotta cheese is the star that brings a unique creaminess you might not expect from a baked poultry dish. Parmesan adds a salty, umami depth, while the fresh and dried herbs contribute aromatic notes that fill the kitchen as it bakes.
Let’s talk about the chicken. For this recipe, boneless, skinless chicken breasts are my go-to. They cook relatively quickly and are easy to handle. I usually opt for breasts that are around 6 to 8 ounces each. If yours are significantly larger or smaller, you might need to adjust the baking time slightly. You can also use chicken tenders if you prefer smaller, quicker-cooking pieces, but they may require a bit less cooking time. The key is to ensure they are cooked through without becoming dry. The ricotta mixture acts as a protective layer, helping to keep the chicken moist during the baking process.
The ricotta cheese is crucial. I always use whole milk ricotta. While part-skim will work in a pinch, the whole milk version provides a richer, creamier texture that is essential for this dish. It’s not just about the fat content; it’s about the emulsification and the way it clings to the chicken. If you’ve never baked with ricotta before, you might be surprised by its mellow flavor and how it becomes almost sauce-like when heated. It’s a gentle flavor that complements, rather than overpowers, the chicken and the other seasonings.
Parmesan cheese is another non-negotiable for me in this recipe. I prefer to grate my own from a block. Pre-grated Parmesan often contains anti-caking agents that can affect the texture and meltability. The sharp, salty flavor of freshly grated Parmesan adds a wonderful savory dimension that balances the creaminess of the ricotta. It also helps to form a light, golden crust on top of the ricotta mixture.
The binding agent here is a large egg. It’s essential for holding the ricotta, Parmesan, and seasonings together, creating a cohesive topping that adheres to the chicken. Without the egg, the ricotta mixture might be too loose and slide off during cooking.
Minced garlic is where a lot of the aromatic flavor comes from. I typically use fresh garlic, as it has a more vibrant taste than garlic powder. Two cloves are usually enough for a subtle garlicky punch, but if you’re a big garlic lover, feel free to add another clove. Mincing it finely ensures that the flavor is evenly distributed throughout the ricotta mixture.
Fresh parsley adds a touch of brightness and color. It’s a mild herb that doesn’t compete with other flavors. Dried Italian seasoning is a convenient way to introduce a blend of classic Mediterranean herbs like oregano, basil, thyme, and rosemary. It provides a good baseline of herbaceousness that works wonderfully with chicken. You can certainly use individual dried herbs if you prefer, or even a mix of fresh herbs like basil and thyme, but the Italian seasoning blend is a reliable shortcut.
Salt and black pepper are, of course, fundamental for seasoning. I find that 1/2 teaspoon of salt and 1/4 teaspoon of pepper provide a good starting point, but you should always taste and adjust according to your preference. The Parmesan cheese also contributes saltiness, so keep that in mind when seasoning.
Finally, olive oil. This is used to coat the chicken and the baking dish. Coating the chicken helps to prevent it from sticking and ensures a slightly crisper exterior, while coating the dish prevents any sticking and makes cleanup easier. I use extra virgin olive oil for its flavor and health benefits.
Here’s another great option: High-Protein Salmon Recipes
How to Make It
- Preheat your oven to 400°F (200°C). Lightly grease a 9×13 inch baking dish with 1 tablespoon of olive oil or cooking spray.
- In a medium bowl, combine the ricotta cheese, grated Parmesan cheese, egg, minced garlic, chopped parsley, Italian seasoning, salt, and pepper. Stir until well combined and creamy.
- Pat the chicken breasts dry with paper towels. Place them in the prepared baking dish in a single layer. Drizzle the remaining 1 tablespoon of olive oil over the chicken breasts and season them lightly with salt and pepper.
- Spoon the ricotta mixture evenly over the top of each chicken breast, spreading it to create a thick, even coating.
- Bake for 25-30 minutes, or until the chicken is cooked through and the ricotta topping is lightly golden and set. An instant-read thermometer inserted into the thickest part of the chicken should register 165°F (74°C).
- Let the chicken rest for 5 minutes in the baking dish before serving.
And there you have it – a simple, elegant meal ready to be enjoyed. This method is all about layering flavors and textures, from the tender chicken to the creamy, savory topping.
To break down the “how-to” a bit further, let’s dive into each step.
Step 1: Preheat and Prepare the Dish. This is a standard first step for most baking recipes, and it’s crucial for ensuring even cooking. By preheating your oven to 400°F (200°C), you’re setting the stage for the chicken to cook through and the ricotta topping to develop a lovely golden hue. A 9×13 inch baking dish is a good size for four chicken breasts, allowing them to sit in a single layer without crowding. Crowding can lead to steaming rather than baking, which is not what we want here. Lightly greasing the dish with olive oil or cooking spray is a simple but important step to prevent the chicken and the ricotta mixture from sticking. A little oil helps with browning and, more importantly, makes cleanup significantly easier. Trust me, scraping burnt-on cheese from a dish is no fun.
Step 2: Prepare the Ricotta Topping. This is where the magic happens. In a medium bowl, you’ll whisk together the star ingredients: ricotta cheese, Parmesan cheese, and that crucial large egg. The egg acts as a binder, ensuring the topping stays put. Then come the flavor boosters: minced garlic for that aromatic bite, fresh parsley for a bit of freshness and color, dried Italian seasoning for an herbaceous depth, and the essential salt and pepper to enhance all the other flavors. You want to stir this mixture until it’s smooth and well combined. It should be thick enough to spread but still pliable. Don’t overmix, but ensure there are no pockets of unmixed ingredients. A creamy, cohesive mixture is what you’re aiming for.
Step 3: Prepare the Chicken. Before the chicken gets its creamy blanket, it needs a little attention. Patting the chicken breasts dry with paper towels is a technique I always employ. This removes excess moisture, which helps the chicken to brown better and prevents the ricotta topping from becoming watery. Place the dried chicken breasts in your prepared baking dish, ensuring they are in a single layer. Then, drizzle the remaining tablespoon of olive oil over them. This light coating of oil will help the chicken remain moist and develop a slightly better texture. Give them a quick, light sprinkle of salt and pepper. This is not the main seasoning; it’s just a little something to season the chicken itself before the topping goes on.
Step 4: Apply the Ricotta Topping. Now for the fun part: generously spooning the prepared ricotta mixture over each chicken breast. You want to spread it evenly, covering the entire surface of the chicken. Aim for a thick, consistent layer. This topping is what will keep the chicken incredibly moist and add a wonderful creamy, savory flavor. Don’t be shy with it! The goal is to have a substantial coating that will hold its shape and texture during baking.
Step 5: Bake to Perfection. This is the waiting game. Slide the baking dish into your preheated oven. The baking time of 25-30 minutes is a general guideline. The most reliable way to know if the chicken is cooked through is to use an instant-read thermometer. Insert it into the thickest part of a chicken breast, avoiding any bone (though in this recipe, there are no bones). The internal temperature should reach 165°F (74°C). If the topping seems to be browning too quickly but the chicken isn’t cooked, you can loosely tent the dish with aluminum foil during the last 10-15 minutes of baking.
Step 6: Rest and Serve. Just like with steak or roasts, chicken benefits from a brief resting period. After taking the dish out of the oven, let it sit for about 5 minutes. This allows the juices to redistribute throughout the chicken, ensuring it stays moist and flavorful when you cut into it. This resting step is often overlooked but makes a noticeable difference.
This recipe is designed to be straightforward, bringing a delicious and well-rounded meal to your table with minimal stress.

Nutrition at a Glance
- Calories: Approximately 350-450 per serving (this can vary based on chicken breast size and specific ingredients used).
- Protein: High in protein due to the chicken breasts.
- Fat: Moderate fat content, primarily from ricotta and Parmesan cheese, and olive oil.
- Carbohydrates: Relatively low in carbohydrates, mainly from the cheese and egg.
- Sodium: Moderate, largely influenced by the Parmesan cheese and added salt.
It’s important to note that these are approximate values. For precise nutritional information, it’s always best to use a recipe nutrition calculator with the exact brands and quantities of ingredients you use. This dish provides a good balance of macronutrients, making it a satisfying and nourishing option, especially when served with a side of vegetables or a salad. The protein content makes it a great choice for muscle building and satiety, while the healthy fats from the ricotta and olive oil contribute to flavor and nutrient absorption.
How to Serve It
- Serve the Baked Ricotta Chicken as is for a lighter meal.
- Accompany with a side of steamed or roasted vegetables like broccoli, asparagus, or green beans.
- Pair with a fresh green salad with a light vinaigrette.
- Serve over a bed of cooked pasta or rice for a more substantial meal.
- Spoon any extra pan juices over the chicken and your chosen side.
This dish is incredibly versatile and can be dressed up or down depending on the occasion and your desired meal complexity.
Let’s expand on these serving suggestions. The beauty of Baked Ricotta Chicken is its adaptability.
Serving it As Is: For a quick and healthy lunch or a lighter dinner, you can truly just serve the chicken directly from the baking dish. The creamy ricotta topping provides enough richness and flavor that it doesn’t necessarily need much else. This is my preferred method when I’m aiming for a simple, low-carb meal or when I want to highlight the delicate flavors of the dish. The chicken itself is very tender, and the topping is satisfyingly creamy.
With Steamed or Roasted Vegetables: This is where the dish really comes alive for a balanced dinner. Steamed broccoli or asparagus provides a fresh, slightly crisp counterpoint to the creamy chicken. Roasting vegetables alongside the chicken (though they’ll need to be started earlier or cooked separately to ensure proper timing) like Brussels sprouts with a touch of balsamic glaze, or bell peppers and onions, adds another layer of flavor and texture. I often toss my vegetables with a little olive oil, salt, and pepper before roasting. They can even be roasted in the same dish after the chicken is removed to rest, soaking up any residual flavors. Think of a medley of colorful vegetables – carrots, zucchini, cherry tomatoes – all roasted to tender perfection.
With a Fresh Green Salad: A vibrant green salad is another excellent companion. It offers a refreshing contrast to the richness of the baked ricotta topping. Use a mix of leafy greens like romaine, spinach, or arugula, and add a few other elements like cucumber, tomatoes, red onion, or even some toasted nuts for crunch. A simple lemon vinaigrette or a light balsamic dressing works wonderfully, cutting through the creamy notes of the chicken without overpowering them. This is my go-to when I want a meal that feels both indulgent and light.
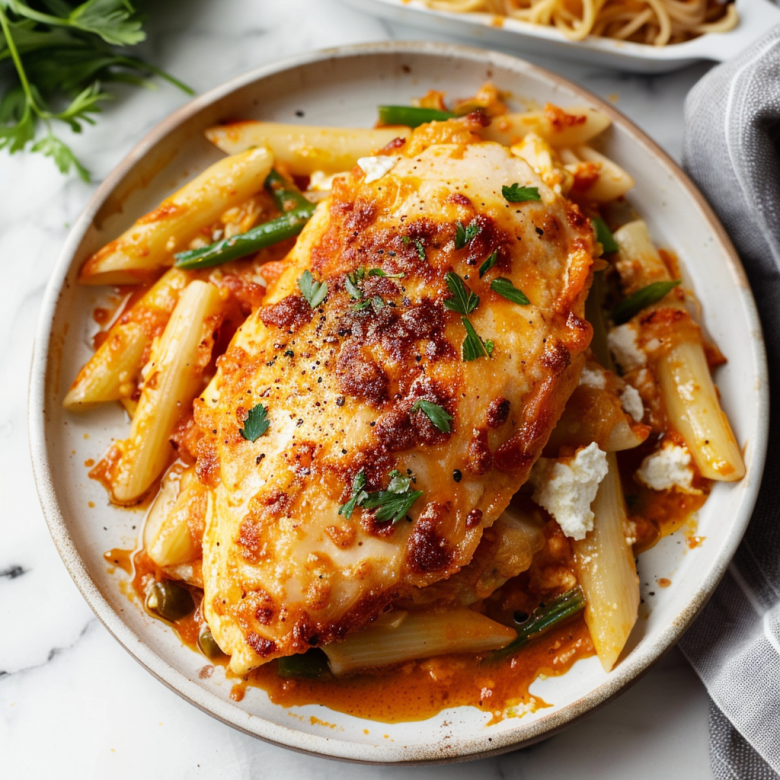
Over Pasta or Rice: If you’re serving this to family or have heartier appetites to satisfy, serving the Baked Ricotta Chicken over a bed of cooked pasta or rice is a fantastic option. The creamy topping will mingle with the grains, creating a cohesive and comforting dish. You can use any type of pasta you like – spaghetti, penne, or fettuccine all work well. Similarly, plain white rice, brown rice, or even a flavorful pilaf can serve as a great base. Some people like to mix a little bit of the cooked pasta or rice directly into the ricotta mixture before spooning it over the chicken, but I prefer to serve it as a topping.
Spoon Any Extra Pan Juices: Don’t discard those delicious bits that collect at the bottom of the baking dish! After the chicken has rested and you’re ready to serve, gently spoon any of the rendered juices from the pan over the chicken and your chosen sides. This adds an extra layer of savory flavor and moisture, ensuring every bite is delicious. These juices are infused with chicken flavor, garlic, herbs, and the subtle essence of the ricotta and Parmesan.
When thinking about presentation, I often garnish the finished dish with a little extra fresh parsley or a sprinkle of Parmesan cheese. A sprinkle of red pepper flakes can also add a touch of heat if desired. The visual appeal is enhanced by the slightly golden, bubbly topping on the tender chicken.
Common Mistakes
- Overcooking the Chicken: This is the most common pitfall with chicken breasts, leading to dry, tough meat. Use a thermometer and don’t guess.
- Not Patting Chicken Dry: Excess moisture prevents browning and can make the ricotta topping watery.
- Using Low-Quality Ricotta: Whole milk ricotta makes a noticeable difference in creaminess and flavor.
- Crowding the Baking Dish: This can lead to steaming rather than baking, affecting the texture of the topping and chicken.
- Skipping the Resting Period: This is crucial for juicy chicken, allowing the juices to redistribute.
Avoiding these minor missteps will ensure a wonderfully moist and flavorful Baked Ricotta Chicken every time.
Let’s elaborate on why these are common issues and how to sidestep them.
Overcooking the Chicken: This is, without a doubt, the nemesis of many poultry dishes. Chicken breasts, especially leaner ones, can go from perfectly cooked to dry and stringy in a matter of minutes. My top tip here is to always, always use an instant-read thermometer. Relying on visual cues alone can be deceiving. The moment the thickest part of the chicken breast registers 165°F (74°C), it’s done. Remember that the temperature will continue to rise slightly as it rests. If your chicken breasts are significantly different in thickness, consider pounding the thicker parts slightly to ensure more even cooking, or group them by thickness in the baking dish. It’s better to pull it out a minute or two early and let the residual heat finish the job than to overcook it.
Not Patting Chicken Dry: This seems like such a small step, but it has a significant impact. When chicken breasts are wet, they release steam when they hit the hot baking dish. This steam prevents the surface from browning and can make the ricotta topping more watery as it bakes. Taking an extra 30 seconds to pat them thoroughly dry with paper towels will lead to a better texture on the chicken and a more appealing, less “soupy” topping.
Using Low-Quality or Part-Skim Ricotta: I’ve tried this recipe with different types of ricotta, and I can tell you, whole milk ricotta is superior for this dish. Part-skim ricotta tends to be a bit more watery and doesn’t have the same creamy mouthfeel. The fat in whole milk ricotta helps to emulsify the mixture, creating a richer, more luxurious topping. It also contributes to a more golden and appealing crust. If you can, spring for the whole milk version; it’s worth it.
Crowding the Baking Dish: This is a fundamental baking principle that applies here. When you pile chicken breasts too closely together, or if the dish is too small, the hot air cannot circulate effectively around each piece. Instead of baking, the chicken starts to steam. This results in a pale, less flavorful chicken and a topping that might not brown properly. Ensure there is some space between each chicken breast in the dish. If you have more than four chicken breasts, you might need to use a slightly larger baking dish or two smaller ones.
Skipping the Resting Period: This is another critical step for juicy poultry. When chicken is cooked, the muscle fibers tighten up, squeezing out moisture. Letting the chicken rest after cooking allows these muscle fibers to relax, and the juices to redistribute evenly throughout the meat. If you cut into it immediately, all that lovely moisture will drain out onto your plate, leaving you with dry chicken. A simple 5-minute rest is all it takes. I usually do this while I’m plating any side dishes.
By being mindful of these points, you’ll be well on your way to consistently delicious Baked Ricotta Chicken.
Storage and Reheating
- Storage: Store leftover Baked Ricotta Chicken in an airtight container in the refrigerator for up to 3-4 days. Ensure the chicken has cooled to room temperature before refrigerating.
- Reheating: For best results, reheat gently. You can:
- Oven: Place leftovers in an oven-safe dish, cover loosely with foil, and reheat at 325°F (160°C) for 10-15 minutes, or until heated through. This method helps to maintain the texture of the topping.
- Stovetop: Reheat in a skillet over medium-low heat, covered, until warm. You may need to add a splash of broth or water to prevent sticking and drying.
- Microwave: Reheat on a microwave-safe plate in 30-second intervals, checking for doneness. This is the quickest method but can sometimes result in a slightly softer topping.
Proper storage and reheating will help preserve the quality and flavor of your leftover Baked Ricotta Chicken.
Let’s expand on making sure your leftovers are just as enjoyable as the first go-round.
Storage Practices: The key to good storage is to cool the food down properly. Don’t leave cooked chicken sitting at room temperature for more than two hours (or one hour if the ambient temperature is above 90°F/32°C). Once cooled, transfer the leftovers to an airtight container. Glass containers are excellent for this as they don’t absorb odors and are easy to clean. You can also use good quality plastic containers or heavy-duty resealable bags. The goal is to minimize exposure to air, which can lead to drying out or spoilage. While 3-4 days is a good general guideline, always use your senses. If it looks or smells off, it’s best to discard it.
Reheating Strategies:
- Oven Method: This is my preferred method for reheating this dish. The key here is to cover it loosely with foil. This traps in steam, helping to rehydrate the chicken and the topping without making them soggy or allowing the topping to burn. Uncovering it for the last few minutes can help to crisp up the topping again if needed. Reheating at a lower temperature (325°F/160°C) rather than a high heat ensures that the chicken reheats gently and doesn’t become tough. It’s like a mini-bake, bringing it back to life.
- Stovetop Method: This is a good option if you’re reheating just a single serving or are in a bit of a rush. You’ll want to use a non-stick skillet. Place the leftovers in the skillet. A small splash of chicken broth, water, or even a touch of cream can help keep things moist and prevent sticking. Cover the skillet to trap heat. Keep the heat on medium-low; you’re aiming to warm it through, not fry it. You’ll want to check it periodically and gently stir or flip any larger pieces to ensure even heating.
- Microwave Method: While the microwave is the fastest option, it can sometimes be the least forgiving when it comes to texture. The rapid heating can make the chicken rubbery and the ricotta topping can become a bit gummy. If you opt for the microwave, use a microwave-safe plate and cover the food loosely with a paper towel or microwave-safe plastic wrap, vented to allow steam to escape. Heat in short intervals of 30-60 seconds, stirring or repositioning the chicken if possible between intervals. This allows you to monitor the reheating process and stop before it becomes overcooked.
No matter which reheating method you choose, remember that the goal is to bring the chicken back to a safe internal temperature (165°F/74°C) while preserving its texture and flavor as much as possible.
Leftover Ideas
- Chicken Salad: Chop the leftover chicken and mix with mayonnaise, celery, onion, and seasonings for a delicious chicken salad sandwich filling. The creamy nature of the leftover chicken lends itself well to this.
- Pasta Toss: Dice the chicken and toss it with cooked pasta, a little extra marinara sauce or pesto, and some fresh vegetables for a quick pasta dish.
- Quesadillas or Tacos: Shred or dice the chicken and use it as a filling for quesadillas or tacos with your favorite toppings.
- Savory Crepes: Fold chopped chicken into savory crepes with a creamy sauce or cheese.
- Stuffed Bell Peppers: Combine chopped chicken with cooked rice, beans, and spices, then stuff into bell peppers and bake until tender.
Leftovers can be just as exciting and delicious with a little creativity.
Let’s get a bit more detailed on how to transform those delicious leftovers into entirely new meals.
Chicken Salad: This is a classic for a reason. The tender, subtly flavored chicken from this dish is a fantastic base. After thoroughly chilling the leftovers, dice them into bite-sized pieces. I like to add finely chopped celery for crunch, a bit of red onion for pungency (or chives for a milder flavor), and a good dollop of good quality mayonnaise. Season with salt and pepper, and a squeeze of lemon juice can brighten everything up. A pinch of Dijon mustard adds a nice tang. This chicken salad is wonderful piled high on crusty bread, stuffed into a pita, or served on a bed of lettuce. It’s also great with crackers.
Pasta Toss: Leftover Baked Ricotta Chicken is a great shortcut for a weeknight pasta meal. Dice the chicken and warm it gently in a skillet. You can add a jar of your favorite marinara sauce, a dollop of pesto, or even a creamy Alfredo sauce. Toss this with your favorite cooked pasta. Add some frozen peas or steamed broccoli to the sauce as it heats for added color and nutrients. The remnants of the ricotta topping will add a lovely creaminess to the sauce itself.
Quesadillas or Tacos: This is a fun and fast option. Shred or dice the leftover chicken. If it’s a bit dry, you can warm it in a skillet with a tablespoon of water or broth. For quesadillas, place a portion of the chicken along with shredded cheese (cheddar, Monterey Jack, or a Mexican blend) between two tortillas and grill or pan-fry until golden and the cheese is melted. For tacos, warm the chicken and serve it in taco shells or warm tortillas with your preferred taco toppings like lettuce, tomato, salsa, sour cream, and cheese.
Savory Crepes: If you happen to make crepes, the shredded or diced chicken makes an excellent filling. You can mix the chicken with a béchamel sauce, a mushroom cream sauce, or simply some sautéed onions and cheese. Fold the filling into your crepes and serve. This elevates the leftovers into something quite sophisticated.
Stuffed Bell Peppers: This is a more involved but very rewarding use of leftovers. Dice or shred the chicken and combine it with cooked rice (white or brown), some sautéed onions and bell peppers, black beans, corn, and your favorite taco or chili seasoning. Stuff this mixture into halved bell peppers that have been blanched or par-baked to soften them. Top with a bit of cheese and bake until the peppers are tender and the filling is heated through and bubbly. The ricotta chicken adds a lovely, moist texture to the filling.
When transforming leftovers, think about reheating them gently to maintain their original texture. Adding sauces, cheeses, or fresh ingredients can mask any slight dryness and bring the dish back to life.
PrintBaked Ricotta Chicken
- Total Time: 45 minutes
- Yield: 4 servings 1x
Description
A simple and delicious recipe for Baked Ricotta Chicken, featuring tender chicken breasts topped with a creamy, savory ricotta mixture. Perfect for weeknight dinners and easy to prepare.
Ingredients
- 4 boneless, skinless chicken breasts (about 6–8 ounces each)
- 1 cup whole milk ricotta cheese
- 1/4 cup grated Parmesan cheese
- 1 large egg
- 2 cloves garlic, minced
- 1 tablespoon chopped fresh parsley
- 1 teaspoon dried Italian seasoning
- 1/2 teaspoon salt
- 1/4 teaspoon black pepper
- 2 tablespoons olive oil
Instructions
- 1. Preheat oven to 400°F (200°C). Lightly grease a 9×13 inch baking dish with 1 tablespoon of olive oil.
- 2. In a medium bowl, whisk together ricotta cheese, Parmesan cheese, egg, minced garlic, parsley, Italian seasoning, salt, and pepper until well combined.
- 3. Pat chicken breasts dry. Place in the prepared baking dish. Drizzle with remaining 1 tablespoon olive oil and season lightly with salt and pepper.
- 4. Spoon the ricotta mixture evenly over each chicken breast.
- 5. Bake for 25-30 minutes, or until chicken is cooked through (165°F/74°C internal temperature).
- 6. Let chicken rest for 5 minutes before serving.
Notes
Store leftovers in an airtight container in the refrigerator for 3-4 days. Reheat gently in the oven or on the stovetop for best results.
- Prep Time: 15 minutes
- Cook Time: 30 minutes
- Category: Main Course
- Method: Baking
- Cuisine: American
Nutrition
- Serving Size: 1 serving
- Calories: 380
- Sugar: 3g
- Sodium: 350mg
- Fat: 20g
- Carbohydrates: 6g
- Fiber: 1g
- Protein: 45g