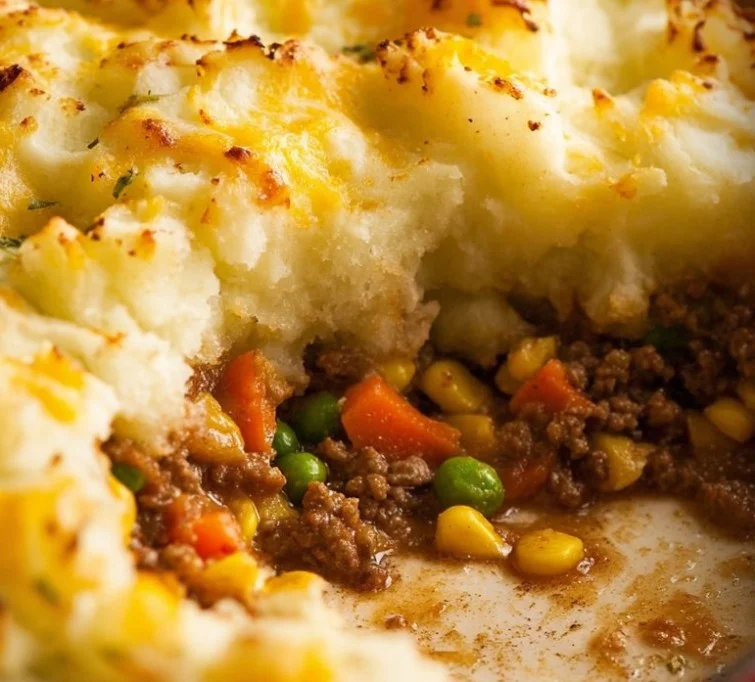
Start with a busy weeknight scene: the kids are doing homework at the kitchen island, there’s a chill in the air, and you want something warm, filling, and honest on the table without extra fuss. This Shepherd’s Pie answers that need, hearty protein, a little veg, and a creamy potato top that browns to golden perfection. It also gives you a serving of comfort with controlled calories and a straightforward pan-to-oven flow I rely on when life gets busy. If you enjoy one-dish comforts that travel well to leftovers, you might also like my lightened pot pie soup idea for similar cozy, family-friendly flavors: lightened chicken pot pie soup.
Print
Hearty Shepherd’s Pie
- Total Time: 55 minutes
- Yield: 6 servings 1x
- Diet: None
Description
A warm and comforting Shepherd’s Pie with a creamy potato top, hearty ground beef, and mixed vegetables, perfect for busy weeknights.
Ingredients
- 1.25 pounds Yukon Gold potatoes, peeled and cubed
- 3 cloves garlic, halved
- 1 pound lean ground beef
- 2 tablespoons flour
- 4 cups frozen mixed vegetables
- 0.75 cup beef broth
- 3 tablespoons ketchup
- 1 teaspoon salt
- 0.5 teaspoon black pepper
- 0.75 cup light sour cream
- 0.5 cup shredded Cheddar cheese, divided
Instructions
- Place cubed potatoes and garlic in a large pot with enough water to cover; bring to a boil and simmer until tender, about 20 minutes.
- Preheat the oven to 375°F (190°C).
- Cook ground beef in a skillet over medium heat until browned and crumbly, about 6 to 8 minutes.
- Stir flour into the beef and drippings; cook for 1 minute.
- Add frozen vegetables, beef broth, ketchup, salt, and black pepper; mix until combined and thickened, about 5 minutes.
- Transfer filling to a 9×13 inch casserole dish, spreading into an even layer.
- Drain potatoes and garlic; return them to the pot and add sour cream and 1/4 cup Cheddar, mashing until smooth.
- Spoon mashed potatoes over the beef mixture, spreading to seal the edges.
- Sprinkle remaining Cheddar on top.
- Bake until cheese melts and the top turns golden, about 20 to 25 minutes. Broil for additional browning if desired.
- Let cool for 10 to 15 minutes before serving.
Notes
For a lighter option, substitute ground beef with plant-based ground or cooked lentils.
- Prep Time: 20 minutes
- Cook Time: 35 minutes
- Category: Main Course
- Method: Baking
- Cuisine: Irish
Nutrition
- Serving Size: 1 serving
- Calories: 420
- Sugar: 5g
- Sodium: 680mg
- Fat: 18g
- Saturated Fat: 8g
- Unsaturated Fat: 8g
- Trans Fat: 0g
- Carbohydrates: 36g
- Fiber: 4g
- Protein: 28g
- Cholesterol: 70mg
Why This Is a Go-To in My Kitchen
This version is reliable because the components are simple and forgiving: browned meat for deep flavor, a thickened vegetable-beef base that holds up under the potatoes, and a mashed potato lid that won’t collapse. Expect familiar, satisfying textures and a savory aroma that fills the house. It reheats well for lunches, travels easily to potlucks, and hits the spot whether it’s weeknight fuel or a Sunday family dinner. You’ll see why I make it on repeat once you know the rhythm.
What You’ll Need
- 1.25 pounds Yukon Gold potatoes, peeled and cubed — creamy texture and thin skins make them easy to mash.
- 3 cloves garlic, halved — mild roasted garlic flavor when boiled with the potatoes.
- 1 pound lean ground beef — browns well and provides savory depth without excess grease.
- 2 tablespoons flour — thickens the filling so it doesn’t run under the potato top.
- 4 cups frozen mixed vegetables — quick, economical, and evenly sized for consistent bites.
- 0.75 cup beef broth — builds the base flavor and gives the filling body.
- 3 tablespoons ketchup — a small sweet-acid balance that deepens the beef flavor.
- 1 teaspoon salt — seasons the filling; adjust to taste.
- 0.5 teaspoon black pepper — brightens the savory mix.
- 0.75 cup light sour cream — enriches the mashed potatoes with tang and creaminess.
- 0.5 cup shredded Cheddar cheese, divided — use half for the mash and half to brown on top; adds a melty finish and sharpness.
How It Comes Together
- Place cubed potatoes and garlic in a large pot with enough water to cover; bring to a boil and simmer until tender, about 20 minutes. (Timing cue: test with a fork; potatoes should be very soft.)
- Preheat the oven to 375 degrees F (190 degrees C) while you work on the filling. (Aroma cue: the oven warms the kitchen, helping flavors deepen once baked.)
- Cook ground beef in a skillet over medium heat until browned and crumbly, about 6 to 8 minutes, draining excess fat if needed. (Texture cue: aim for small crumbles so the filling is even under the potatoes.)
- Stir flour into the beef and drippings and cook 1 minute to eliminate raw flour taste, then stir in frozen vegetables, beef broth, ketchup, salt, and black pepper until combined and thickened, about 5 minutes. (Timing cue: simmer until reduced slightly so the filling will hold when baked.)
- Transfer the thickened beef and vegetable mixture to an ovenproof 9×13 casserole dish, spreading into an even layer. (Texture cue: a slightly drier filling helps the potato layer stay intact.)
- Drain potatoes and garlic well and return them to the pot; add sour cream and 1/4 cup shredded Cheddar and mash until smooth and creamy. (Texture cue: mash to your preferred texture; smoother yields a more classic top.)
- Spoon or dollop mashed potatoes onto the beef mixture and spread from the center to the edges to seal; sprinkle remaining 1/4 cup Cheddar on top. (Timing cue: spreading from center helps seal the edges so the filling won’t bubble over.)
- Bake in the preheated oven until cheese melts and the top turns golden, 20 to 25 minutes, then broil 1 to 2 minutes if you want extra browning. (Aroma cue: look for a toasty, cheese-browned scent and bubbling edges.)
- Cool 10 to 15 minutes before serving so the filling firms up and slices hold their shape. (Timing cue: resting prevents the filling from running when you scoop servings.)
How This Dish Fuels the Day
One serving (about 1/6 of the casserole) provides roughly 420 calories with approximately 28 grams protein, 36 grams carbohydrates, 18 grams fat, 4 grams fiber, and about 680 milligrams sodium; exact values vary by brands and adjustments.
The protein and carbs combo gives steady energy and satiety, while the vegetables contribute fiber and micronutrients.
For a real-life health insight: pairing this with a simple salad or extra green veg balances the meal and boosts volume without many extra calories.
How This Recipe Shows Up at Mealtime
This dish is at home on weeknights, casual weekend dinners, or holiday sides when you want comfort that serves a crowd. Serve warm with a crisp green salad or roasted broccoli for a simple contrast in texture and brightness. For a lighter plate, offer lemony steamed green beans and a jar of pickled beets or a sharp vinaigrette on the side to cut through the richness. If you’re planning to bring it to a gathering, it travels well covered and finishes beautifully with a quick reheat; for another cozy variation, try a slow-cooker comfort with similar flavors like this slow-cooker chicken pot pie soup that leans on the same homey notes.
Storing and Reheating Without Ruining It
Refrigerate leftovers in an airtight container for up to 3 to 4 days; the potatoes may firm up but will soften on reheating. To freeze, cool completely, wrap tightly in foil and plastic wrap or freeze in a sealed container for up to 3 months; thaw overnight in the fridge before reheating. Reheat single portions in the microwave for 2 to 3 minutes or reheat the whole dish at 350 degrees F until warmed through, about 25 to 35 minutes, covering loosely with foil to prevent the top from burning. Freshness tip: add a splash of broth when reheating if the filling seems dry—this revives the texture without changing flavor.
Small Details That Make a Big Difference
- Use Yukon Gold potatoes for a naturally creamy mash that needs less dairy; they’re forgiving and yield a silky top.
- Don’t skip the flour step; it stabilizes the filling so slices hold when served and leftover portions reheat neatly.
- Brown the beef well for extra flavor complexity—those browned bits are flavor gold.
- Seal the potato layer to the edges of the dish so the filling doesn’t bubble up and make a mess while baking.
- If you like a crunchy top, finish under the broiler for 1 to 2 minutes and watch closely to avoid burning.
Ways to Change It Without Breaking It
- Seasonal: Swap in roasted root vegetables like diced parsnips and carrots instead of frozen mixed vegetables for a winter-forward Shepherd’s Pie.
- Comfort-focused: Add a tablespoon of Worcestershire sauce and a splash of red wine to the filling for deeper, richer comfort flavors that remind you of classic pub-style pies.
- Slightly elevated: Stir in a handful of chopped fresh thyme and use smoked Cheddar on top to add an upscale, aromatic twist while keeping technique the same.
What Can Go Wrong and How to Fix It
- Problem: Watery filling that makes the pie runny. Fix: Simmer the filling longer to reduce excess liquid or stir in an extra teaspoon of flour and cook 2 more minutes to thicken.
- Problem: Potatoes are grainy or gluey. Fix: Don’t overwork them with a food processor; mash by hand and stop when smooth but not adhesive.
- Problem: Top browns too fast but filling is cold. Fix: tent loosely with foil during baking and remove foil the last 5 minutes; broil briefly only at the end.
- Problem: Bland overall flavor. Fix: taste and adjust with a pinch more salt, a dash of Worcestershire sauce, or a squeeze of lemon on the side to brighten.
Turning Leftovers Into Something New
- Pie-stuffed peppers: Core bell peppers, fill with warmed Shepherd’s Pie filling, top with an extra sprinkle of cheese, and bake 20 minutes until peppers are tender.
- Shepherd’s Pie skillet hash: Sauté leftover pie in a skillet until edges crisp, top with a fried egg for a breakfast-for-dinner feel. Try adding a dash of hot sauce for contrast.
- Hearty pot pie soup twist: Mash or thin the leftovers with a bit of broth to make a quick soup base and stir in greens for a different, spoonable meal; for a high-protein take, see this high-protein pot pie soup with Greek yogurt for ideas on textures and enrichments.
Questions Readers Often Ask
Q: Can I make this vegetarian?
A: Yes. Swap the ground beef for a plant-based ground or use cooked lentils and finely chopped mushrooms for a meaty texture; reduce broth slightly and season with soy sauce or tamari for savory depth. Finish the same way with the potato topping.
Q: How can I keep the potato top from getting soggy when reheating?
A: Reheat uncovered in a moderate oven to allow moisture to escape; if microwaving, heat briefly and then crisp under the broiler for a minute, watching closely to avoid burning.
Q: Is there a good make-ahead method?
A: Assemble everything up to the baking step, cover tightly, and refrigerate for up to 24 hours. Bake straight from the fridge, adding 5 to 10 minutes to the bake time, or bake from room temperature per the recipe.
Q: Can I use russet potatoes instead of Yukon Gold?
A: You can, but russets make a fluffier, drier mash and may need extra butter or sour cream for creaminess; Yukon Golds give a naturally richer, creamier result with less fuss.
Conclusion
If you want to compare this version to Chef John’s approach and see another tested technique, check out Chef John’s original Shepherd’s Pie for helpful notes and a slightly different flavor profile.