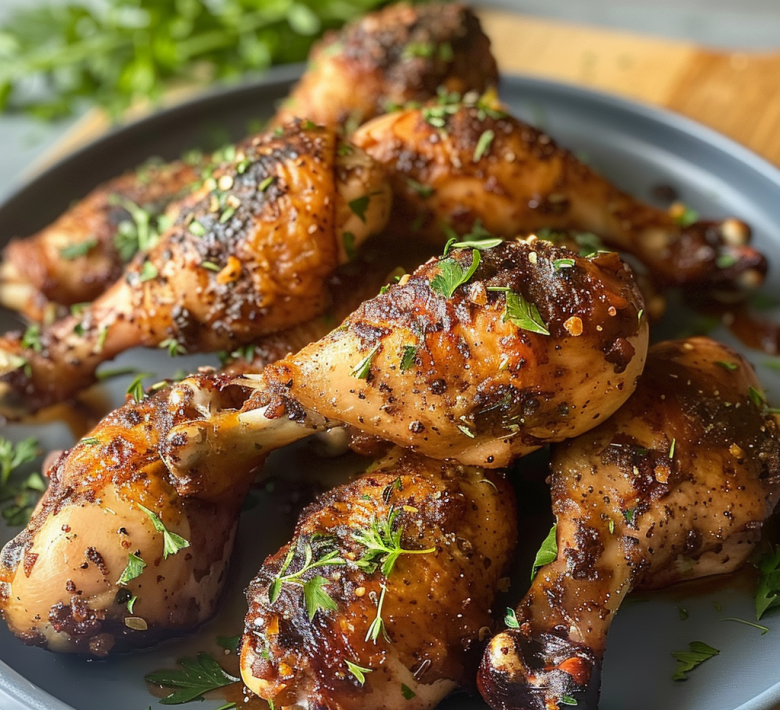
There are few things as satisfying as a batch of perfectly baked chicken legs. They’re a go-to for weeknight dinners, casual gatherings, and even simple lunches. This recipe, honed through countless kitchen experiments, delivers incredibly tender and flavorful chicken with a delightful outer crispness, all made conveniently in your oven. It’s the kind of unfussy, dependable recipe that becomes a staple.
Why This Oven Baked Chicken Legs Recipe Works
This recipe shines because it focuses on simple techniques that bring out the natural goodness of chicken legs. Achieving crispy skin without drying out the meat is often the goal, and the combination of proper preparation, balanced seasoning, and controlled oven heat makes that achievable. It’s straightforward enough for beginners but delivers results that even experienced cooks appreciate.
Ingredients
- 2.5 – 3 pounds chicken legs (about 6-8 pieces)
- 2 tablespoons olive oil
- 1 teaspoon garlic powder
- 1 teaspoon onion powder
- 1 teaspoon paprika
- 1 teaspoon dried thyme
- 1/2 teaspoon salt
- 1/4 teaspoon black pepper
- Optional: 1/4 teaspoon cayenne pepper for a touch of heat
Gather these simple pantry staples and fresh chicken legs to get started on making the best damn oven baked chicken legs.
A recipe worth trying: Incredible Sesame Chicken Salad
How to Make It
- Preheat Oven and Prepare Baking Sheet: Preheat your oven to 400°F (200°C). Line a large baking sheet with parchment paper or aluminum foil for easier cleanup. This prevents sticking and makes tidying up a breeze after your delicious meal.
- Pat Chicken Dry: This is a crucial step for crispy skin, so don’t skip it! Thoroughly pat each chicken leg dry with paper towels. The drier the skin, the crispier it will become in the oven. Get into all the nooks and crannies.
- Season the Chicken: In a large bowl, combine the olive oil, garlic powder, onion powder, paprika, dried thyme, salt, black pepper, and cayenne pepper (if using). Add the dried chicken legs to the bowl and toss gently to coat them evenly with the seasoning mixture. Make sure every piece is well-seasoned. If you have time, you can let the seasoned chicken sit at room temperature for 15-30 minutes before baking; this helps with even cooking.
- Arrange on Baking Sheet: Place the seasoned chicken legs on the prepared baking sheet in a single layer, ensuring they are not touching each other. This allows for proper air circulation around each leg, promoting even cooking and crisping. Crowding the pan will steam the chicken rather than bake it.
- Bake: Bake for 35-45 minutes, or until the internal temperature reaches 165°F (74°C) when measured with a meat thermometer inserted into the thickest part of the thigh, avoiding the bone. The skin should be golden brown and crispy. For an extra crispy skin finish, you can turn on the broiler for the last 1-2 minutes of cooking, keeping a very close eye on it to prevent burning.
- Rest: Once baked, remove the chicken legs from the oven and let them rest on the baking sheet for 5-10 minutes before serving. This resting period allows the juices to redistribute throughout the meat, resulting in more tender and moist chicken.
Follow these straightforward steps and you’ll have a batch of delicious, tender, and flavorful chicken legs ready to enjoy.
Nutrition at a Glance
- Calories: Approximately 250-350 per serving (depending on size and skin).
- Protein: A good source of lean protein, typically 25-35g per serving.
- Fat: Contains healthy fats, with a portion coming from the skin.
- Carbohydrates: Very low carbohydrate content.
- Vitamins and Minerals: Provides essential nutrients like B vitamins (especially niacin and B6), phosphorus, and selenium.
While this recipe focuses on flavor and texture, it’s also a nutritious choice thanks to the inherent benefits of chicken.
How to Serve It
- Classic Comfort Meal: Serve these chicken legs with your favorite sides like mashed potatoes, roasted vegetables (broccoli, carrots, potatoes), or a simple side salad.
- BBQ Style: Brush with your favorite BBQ sauce during the last 10 minutes of baking or after they come out of the oven for a sticky, sweet, and savory finish.
- Taco Night Addition: Shred the cooked meat and use it as a flavorful filling for tacos, burritos, or quesadillas.
- Wraps and Sandwiches: Chop or shred the chicken and use it in wraps or sandwiches with your preferred condiments and toppings.
These versatile chicken legs can be the star of many delicious meals.
Common Mistakes
- Skipping the Pat-Dry Step: This is the most common culprit for soggy skin. Moisture on the skin prevents it from crisping up properly in the oven. Always take the time to pat the chicken thoroughly dry with paper towels before seasoning.
- Overcrowding the Pan: Baking too many chicken legs at once on a single baking sheet will cause them to steam instead of roast. The heat won’t circulate properly, leading to uneven cooking and less desirable texture. Use a large enough baking sheet, or two if necessary, to ensure the legs are in a single layer with some space between them.
- Not Resting the Chicken: Cutting into the chicken immediately after it comes out of the oven can result in juices running out, leading to drier meat. Allowing the chicken to rest for a few minutes lets the juices redistribute, ensuring a more tender and flavorful bite.
- Incorrect Temperature or Cooking Time: Ovens vary, and chicken leg sizes can differ. Relying solely on a timer without checking the internal temperature can lead to undercooked or overcooked chicken. Always use a meat thermometer to ensure the chicken reaches a safe internal temperature of 165°F (74°C).
- Under-Seasoning: Chicken legs, especially with the skin on, can handle a good amount of seasoning. Using too little will result in bland chicken. Don’t be afraid to be generous with your spice blend, ensuring each piece is well-coated.
Avoiding these common pitfalls will significantly improve the outcome of your baked chicken legs, ensuring a delicious and satisfying meal every time.
Storage and Reheating
- Storage: Once cooled to room temperature, store leftover chicken legs in an airtight container in the refrigerator for up to 3-4 days. Ensure they are properly sealed to maintain freshness and prevent them from drying out.
- Reheating in the Oven: For the crispiest results, reheat chicken legs in a preheated oven at 350°F (175°C) for about 10-15 minutes, or until heated through. Place them on a baking sheet to allow air to circulate around them.
- Reheating in an Air Fryer: An air fryer is also excellent for reheating. Place the chicken legs in the air fryer basket and cook at 375°F (190°C) for 5-8 minutes, flipping halfway through, until heated and crispy again.
- Reheating on the Stovetop: You can also reheat them in a skillet over medium-low heat with a little oil, turning occasionally, until warmed through. This method might make the skin less crispy but is still effective.
- Microwave Reheating: While the quickest method, microwaving can make the skin rubbery and the meat a bit tougher. If you must use a microwave, heat in short intervals, checking for doneness, and consider covering loosely to retain some moisture.
Proper storage and reheating will help you enjoy your delicious chicken legs even days after the initial cooking.

Leftover Ideas
- Chicken Salad: Shred or dice the cold chicken legs and mix with mayonnaise, celery, onion, and your favorite seasonings for a classic chicken salad. Add a touch of Dijon mustard for extra zing. Serve on bread, in lettuce wraps, or with crackers.
- Add to Soups and Stews: Chop up the leftover chicken and add it to hearty soups, stews, or chili during the last 15-20 minutes of cooking. It adds a wonderful protein boost and flavor.
- Quesadilla Filling: Dice the chicken and use it as a filling for cheese quesadillas. Melt some cheese in a tortilla, sprinkle with chicken, fold, and cook until golden brown and melty.
- Pasta Dishes: Toss chopped chicken into pasta dishes, such as a creamy Alfredo or a simple marinara, to make them more substantial and protein-rich.
- Grain Bowls: Serve chilled or reheated chicken with your favorite grains (quinoa, rice, farro), roasted vegetables, and a flavorful dressing for a healthy and satisfying grain bowl.
Don’t let those delicious leftovers go to waste; transform them into new and exciting meals with these simple ideas.
PrintBest Damn Oven Baked Chicken Legs Recipe – RecipeTeacher
- Total Time: 1 hour
- Yield: 6–8 servings 1x
Description
Achieve incredibly tender and flavorful chicken legs with crispy skin using this simple and reliable oven-baked recipe. A weeknight dinner favorite!
Ingredients
- 2.5 – 3 pounds chicken legs (about 6–8 pieces)
- 2 tablespoons olive oil
- 1 teaspoon garlic powder
- 1 teaspoon onion powder
- 1 teaspoon paprika
- 1 teaspoon dried thyme
- 1/2 teaspoon salt
- 1/4 teaspoon black pepper
- Optional: 1/4 teaspoon cayenne pepper
Instructions
- 1. Preheat oven to 400°F (200°C). Line a baking sheet with parchment paper or foil.
- 2. Pat chicken legs thoroughly dry with paper towels.
- 3. In a large bowl, combine olive oil, garlic powder, onion powder, paprika, thyme, salt, pepper, and cayenne (if using). Add chicken legs and toss to coat evenly.
- 4. Arrange seasoned chicken legs in a single layer on the prepared baking sheet, ensuring they don’t touch.
- 5. Bake for 35-45 minutes, or until internal temperature reaches 165°F (74°C) and skin is golden brown and crispy. For extra crisp, broil for 1-2 minutes at the end, watching closely.
- 6. Let chicken rest for 5-10 minutes before serving.
Notes
Store any remaining cooked chicken in an airtight container in the refrigerator for up to 3-4 days. Reheat in the oven at 350°F (175°C) for 10-15 minutes for best results.
- Prep Time: 15 minutes
- Cook Time: 45 minutes
- Category: Main Course
- Method: Baking
- Cuisine: American
Nutrition
- Serving Size: 1 serving
- Calories: 300
- Sugar: 1g
- Sodium: 400mg
- Fat: 20g
- Carbohydrates: 2g
- Fiber: 1g
- Protein: 28g