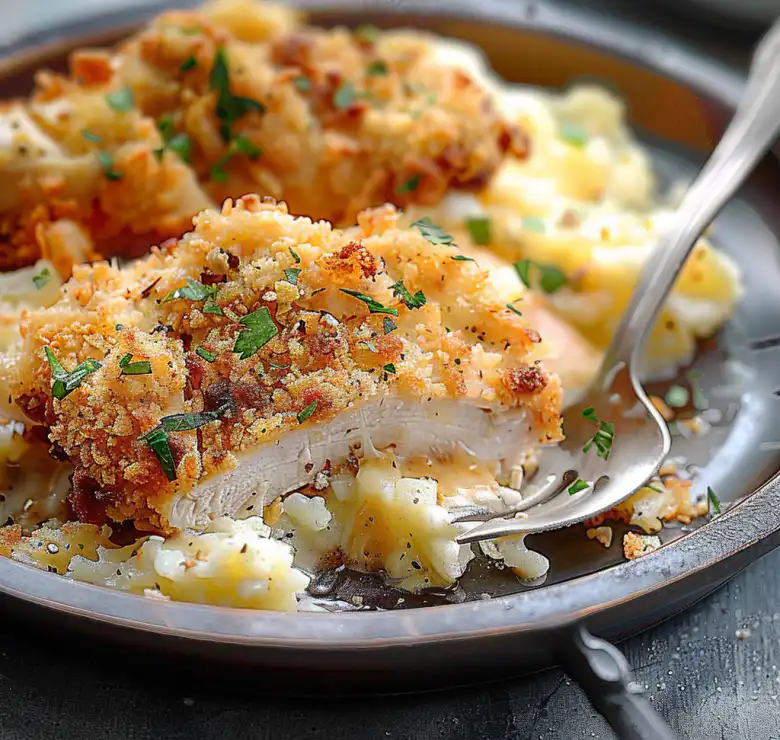
This recipe, which I’ve adapted to be a regular in my kitchen rotation, is my take on the Longhorn Crusted Chicken. It’s designed to be achievable for home cooks who appreciate flavor and a straightforward process, aiming to bring a touch of restaurant-quality dining into your weeknights without undue complication.
Why This Longhorn Crusted Chicken Works
This dish is a consistent winner on my table because it delivers a genuinely satisfying crunch and a deep, savory flavor profile that feels both comforting and a little bit special, all without requiring advanced culinary techniques.
Ingredients
- 2 boneless, skinless chicken breasts (about 6-8 ounces each)
- 1/2 cup all-purpose flour
- 1/2 teaspoon salt
- 1/4 teaspoon black pepper
- 2 large eggs
- 1 tablespoon milk or water
- 1 cup Panko breadcrumbs
- 1/2 cup grated Parmesan cheese
- 1 teaspoon dried Italian seasoning (or a mix of dried oregano, basil, and thyme)
- 1/4 teaspoon garlic powder
- 2 tablespoons olive oil, plus more for drizzling if needed
Gathering all your ingredients before you begin is key to a smooth cooking process. This preparation step helps prevent any last-minute scrambling and ensures you have everything readily available when you need it, allowing you to focus on the cooking itself.
Check this out: Parmesan Crusted Chicken Recipe
How to Make It
Let’s get cooking! This numbered guide will walk you through each step to create delicious Longhorn Crusted Chicken that you’ll want to make again and again.
- Prepare the Chicken: If your chicken breasts are particularly thick, which is common, it’s a good idea to even them out. You can do this by butterflying them (slicing them horizontally almost all the way through and opening them up like a book) or by gently pounding them to an even thickness of about 1/2 inch. This crucial step ensures that the chicken cooks uniformly – no more dry edges or undercooked centers. To pound the chicken, place it between two pieces of plastic wrap or inside a large zip-top bag. Then, use the flat side of a meat mallet, a rolling pin, or even a heavy skillet to gently but firmly press down until you reach the desired thickness. Set the prepared chicken aside on a clean plate or cutting board.
- Set Up Your Dredging Stations: To achieve that perfectly crisp and flavorful crust, we’ll use a classic three-step dredging process. You’ll need three shallow dishes or pie plates. In the first dish, combine the all-purpose flour, salt, and black pepper. Whisk these dry ingredients together thoroughly with a fork to ensure the salt and pepper are evenly distributed throughout the flour. This initial coating of flour helps to dry the surface of the chicken slightly, providing a better surface for the egg to adhere to in the next step. In the second dish, whisk the two large eggs with the tablespoon of milk or water. The milk or water helps to create a slightly thinner, more even egg wash, which is essential for coating the chicken effectively. Whisk until well combined and somewhat frothy. This egg wash will act as the binder that holds the breading.
- Dredge the Chicken: Now it’s time to coat the chicken. Take one piece of the prepared chicken and place it into the flour mixture. Gently turn it to coat both sides evenly. Tap off any excess flour; you don’t want thick clumps of flour, just a light, even dusting. Next, dip the floured chicken into the egg wash, ensuring it is fully submerged. Let any excess egg wash drip back into the dish for a moment – this prevents the breadcrumb mixture from becoming too wet. Finally, place the egg-coated chicken into the Panko-Parmesan mixture. Press the breadcrumbs firmly onto both sides of the chicken, ensuring that the coating adheres well.
- Sear the Chicken: Heat the 2 tablespoons of olive oil in a large, oven-safe skillet over medium-high heat. It’s important that the skillet is hot before you add the chicken; you can test this by flicking a tiny bit of water into the pan – it should sizzle immediately. Once the oil is shimmering (but not smoking, which indicates it’s too hot), carefully place the breaded chicken breasts into the hot skillet. You should hear a satisfying sizzle as they make contact with the pan. This searing step is crucial for developing that beautiful golden-brown color and a foundational crispness for the crust.
- Finish in the Oven: Once the chicken has been seared beautifully on both sides, it’s time to finish cooking it in the oven. Transfer the skillet with the seared chicken directly into a preheated oven set at 400°F (200°C). If your skillet isn’t oven-safe, don’t worry. You can carefully transfer the seared chicken breasts to a baking sheet that has been lined with parchment paper or aluminum foil for easier cleanup. Bake for approximately 15 to 20 minutes. The exact baking time will depend on the thickness of your chicken breasts and how thoroughly they were seared. The most reliable way to know if the chicken is cooked through is to check its internal temperature with a meat thermometer. It should register 165°F (74°C) when inserted into the thickest part of the breast.
- Rest and Serve: Once the chicken has reached the desired internal temperature and is cooked through, carefully remove the skillet or baking sheet from the oven. Allow the Longhorn Crusted Chicken to rest for at least 5 minutes before slicing or serving. This resting period is often overlooked but is absolutely vital. It allows the juices that have been driven to the center of the chicken during cooking to redistribute throughout the meat, resulting in a more tender and moist final product. Skipping this step can lead to the juices escaping onto the plate, leaving the chicken drier.
And there you have it – a delicious, restaurant-worthy dish made right in your own kitchen with minimal fuss.
Nutrition at a Glance
Here’s a general overview of the nutritional content you can expect from this Longhorn Crusted Chicken recipe. Please keep in mind that these values are approximate and can vary based on the specific brands of ingredients used, the size of the chicken breasts, and the amount of oil absorbed during cooking.
- Calories: Approximately 350-450 calories per serving. This figure can fluctuate considerably based on the overall size of the chicken breast and how much oil is absorbed by the breading during the searing and baking processes.
- Protein: This dish is an excellent source of lean protein, typically providing around 35-45 grams per serving, primarily from the chicken breast itself.
- Fat: It contains a moderate amount of fat. The majority of this fat comes from the olive oil used for searing and baking, as well as the natural fats present in the Parmesan cheese used in the crust.
- Carbohydrates: The carbohydrate content is relatively low, mainly derived from the all-purpose flour and Panko breadcrumbs used in the coating.
- Sodium: Sodium levels can vary. They are influenced by the amount of salt you add to the flour mixture and, importantly, the sodium content of the grated Parmesan cheese, which can differ significantly between brands.
- Fiber: As this is a protein- and fat-focused dish, it is naturally low in dietary fiber.
How to Serve It
This Longhorn Crusted Chicken is wonderfully versatile and can be paired with a wide array of side dishes to create a complete and satisfying meal.
- Classic Pairing: For a balanced and refreshing meal, serve the crispy chicken alongside a fresh, crisp green salad. A simple vinaigrette dressing complements the richness of the chicken without overpowering it.
- Hearty Sides: Roasted vegetables offer an excellent complement. Think about dishes like roasted broccoli, tender asparagus spears, or flavorful Brussels sprouts. Their earthy flavors and varied textures stand up well to the crispy chicken.
- Comforting Starches: A side of creamy mashed potatoes, a fluffy baked potato, or even a simple serving of steamed rice can provide a comforting base for the meal and absorb any delicious pan juices.
- Sauce Accompaniments: While this chicken is flavorful enough to enjoy on its own, you can elevate it further with a complementary sauce. A classic marinara sauce, a bright lemon-butter sauce, or even a zesty horseradish cream sauce can add an interesting new dimension.
This dish truly acts as a centerpiece that can be tailored to suit your preferences or the occasion with the right selection of side dishes.

Common Mistakes
Even experienced home cooks can sometimes encounter minor setbacks. Here are a few common pitfalls to be aware of that might arise when preparing this Longhorn Crusted Chicken, along with tips to avoid them for a consistently successful outcome.
- Uneven Chicken Thickness: If the chicken breasts are not pounded or butterflied to an even thickness, they will cook unevenly. This often results in parts of the chicken being overcooked and dry, while other sections remain undercooked and potentially unsafe to eat. Always aim for uniformity in thickness for consistent results.
- Not Pressing the Coating Firmly: After dipping the chicken in the egg wash, it’s important to press the breadcrumb mixture onto the surface. If the breading is just loosely applied, it can easily fall off the chicken during cooking, leaving you with less crust and a less visually appealing dish.
- Starting with a Cold Skillet: Searing the chicken in a skillet that has not been sufficiently preheated will lead to a pale, greasy, and less crispy crust. The chicken will also tend to stick to the pan. Ensure your oil is shimmering before adding the chicken for that immediate golden crisp.
- Overcrowding the Pan: Trying to cook too many chicken breasts at once in the skillet can significantly lower the temperature of the hot oil. This compromises the searing process, leading to soggy chicken and an underdeveloped crust. Cook in batches if necessary to maintain optimal heat.
- Forgetting to Check for Doneness: Relying solely on the suggested cooking time without using a meat thermometer can be risky. Chicken needs to reach a safe internal temperature of 165°F (74°C). Overcooking will dry out the chicken, while undercooking is a food safety concern. A thermometer is your best friend here for accuracy.
Being aware of these potential issues can help ensure you achieve the best possible result with your Longhorn Crusted Chicken, making your cooking experience more rewarding.
Storage and Reheating
Proper storage and effective reheating techniques are essential for maintaining the quality and enjoyment of any leftover dishes.
- Refrigeration: Once the Longhorn Crusted Chicken has cooled completely, store it in an airtight container in the refrigerator. It should remain fresh and safe to consume for up to 3 to 4 days. It is important to ensure the chicken is fully cooled before sealing the container, as trapped heat can create condensation, which may soften the crust.
- Reheating Method (Oven): The most recommended method for reheating this dish, aiming to preserve its crispiness, is by using your oven. Arrange the leftover chicken pieces on a baking sheet, which can be lined with parchment paper for simpler cleanup. Reheat in a preheated oven at 350°F (175°C) for approximately 10 to 15 minutes, or until the chicken is heated through. The goal is to warm it gently to avoid drying out the meat while still crisping the exterior.
- Reheating Method (Air Fryer): An air fryer is another excellent appliance for reheating crispy foods. Place the leftover chicken in the air fryer basket in a single layer. Cook at 350°F (175°C) for about 5 to 8 minutes, remembering to flip the pieces halfway through the cooking time, until they are warmed through and the crust has regained some of its crispness.
- Reheating Method (Stovetop): While it is possible to reheat on the stovetop, this method can sometimes make the breading more susceptible to becoming soggy or separating from the chicken, especially if too much oil is used. If you choose this method, use a non-stick pan with a small amount of oil over medium-low heat, turning the chicken pieces occasionally to ensure even warming without excessive crisping.
By employing these methods, you can help ensure that your leftovers taste as appealing as when they were first prepared.
Leftover Ideas
Don’t let any of that delicious Longhorn Crusted Chicken go to waste! Leftovers can be wonderfully transformed into entirely new and exciting dishes.
- Chicken Salad Creations: Chop the leftover chicken into small pieces and use it as the protein base for a classic chicken salad sandwich filling, or simply serve it atop a bed of mixed greens for a hearty and flavorful salad. The seasoned crust adds an interesting texture to traditional chicken salad.
- Versatile Bowls: Slice the leftover chicken thinly. It’s an excellent addition to pasta dishes, vibrant quinoa bowls, or comforting rice bowls, providing a delightful boost of protein and a satisfying textural contrast.
- Creative Quesadillas or Tacos: Shred or dice the chicken and incorporate it into your favorite quesadilla or taco recipes. The seasoned crust lends a unique and appealing layer of flavor and texture to these familiar handheld favorites.
- Hearty Soup or Stew Enhancements: Chop the leftover chicken into bite-sized morsels and add them to rich, hearty soups or stews during the final stages of cooking. This allows the chicken to warm through while infusing its flavor into the broth.
Transforming leftovers into new meals is not only an effective way to reduce food waste but also a smart strategy for enjoying delicious and varied culinary experiences throughout the week.
PrintLonghorn Crusted Chicken | Chefjar
- Total Time: 40-45 minutes
- Yield: 2 servings 1x
Description
This Longhorn Crusted Chicken recipe offers a crispy, flavorful Parmesan and Panko crust on tender chicken breasts, perfect for a weeknight dinner. Easy to make with simple ingredients.
Ingredients
- 2 boneless, skinless chicken breasts (about 6–8 ounces each)
- 1/2 cup all-purpose flour
- 1/2 teaspoon salt
- 1/4 teaspoon black pepper
- 2 large eggs
- 1 tablespoon milk or water
- 1 cup Panko breadcrumbs
- 1/2 cup grated Parmesan cheese
- 1 teaspoon dried Italian seasoning (or a mix of dried oregano, basil, and thyme)
- 1/4 teaspoon garlic powder
- 2 tablespoons olive oil, plus more for drizzling if needed
Instructions
- 1. Prepare Chicken: If chicken breasts are thick, pound to 1/2-inch thickness or butterfly.
- 2. Set Up Dredging Stations: In three shallow dishes, combine flour, salt, and pepper; whisk eggs with milk/water; mix Panko, Parmesan, Italian seasoning, and garlic powder.
- 3. Dredge Chicken: Coat chicken in flour, then egg wash, then press firmly into Panko mixture, ensuring full coverage. Repeat for second breast.
- 4. Sear Chicken: Heat olive oil in an oven-safe skillet over medium-high heat. Sear chicken for 3-4 minutes per side until golden brown and crisped.
- 5. Finish in Oven: Transfer skillet (or chicken on a baking sheet) to a preheated 400°F (200°C) oven. Bake for 15-20 minutes, or until internal temperature reaches 165°F (74°C).
- 6. Rest and Serve: Let chicken rest for 5 minutes before slicing or serving.
Notes
Store fully cooled leftovers in an airtight container in the refrigerator for up to 3-4 days. Reheat in a 350°F (175°C) oven or air fryer for best results to maintain crispness.
- Prep Time: 15 minutes
- Cook Time: 25-30 minutes
- Category: Main Course
- Method: Baking, Pan-Frying
- Cuisine: American
Nutrition
- Serving Size: 1 chicken breast
- Calories: Approx. 400
- Sugar: Approx. 2g
- Sodium: Approx. 500mg
- Fat: Approx. 25g
- Carbohydrates: Approx. 15g
- Fiber: Approx. 1g
- Protein: Approx. 40g