There’s something inherently comforting about the aroma of a fresh apple cake baking in the oven, especially when it’s topped with a dreamy cream cheese frosting. This Irresistible Fresh Apple Cake with Dreamy Cream Cheese Frosting not only fills your home with warmth but also melts in your mouth, inviting you to savor every delicious bite. You know that delightful moment when you pull a cake out of the oven, and the whole house smells sweet and homey? That’s what we’re creating here, and I can’t wait to share it with you!
Print
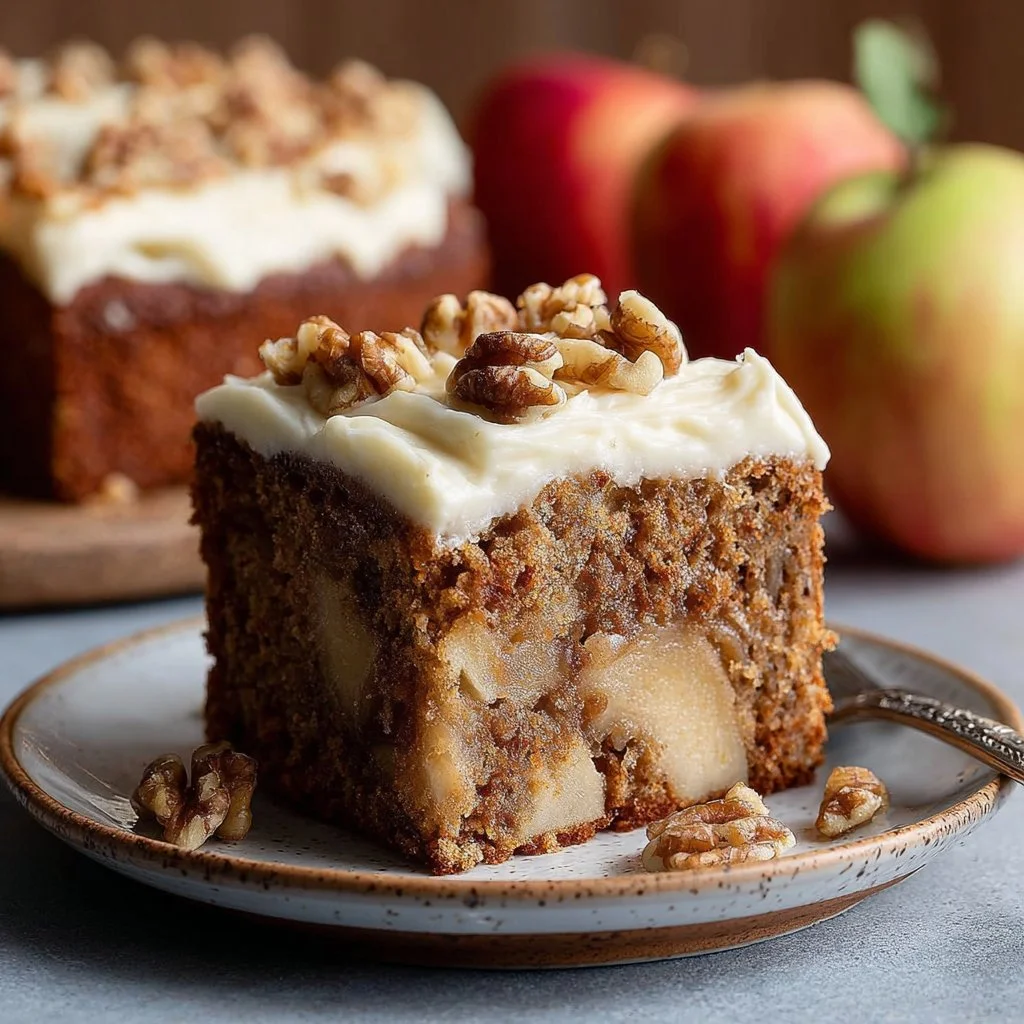
Irresistible Fresh Apple Cake with Dreamy Cream Cheese Frosting
- Total Time: 55 minutes
- Yield: 12 servings 1x
- Diet: Vegetarian
Description
A moist apple cake topped with rich cream cheese frosting, filling your home with warmth and inviting indulgence.
Ingredients
- 2 cups all-purpose flour
- 1 tsp baking soda
- 1/2 tsp salt
- 1 tsp cinnamon
- 1/2 cup unsalted butter, softened
- 1 cup granulated sugar
- 2 large eggs
- 1 tsp vanilla extract
- 2 cups grated apples
- 1/2 cup chopped walnuts (optional)
- 8 oz cream cheese, softened
- 1/4 cup unsalted butter, softened
- 2 cups powdered sugar
- 1 tsp vanilla extract
Instructions
- Preheat your oven to 350°F (175°C) and grease and flour a 9×13-inch baking pan.
- In a medium bowl, whisk together the flour, baking soda, salt, and cinnamon.
- In a separate large bowl, beat the softened butter with the granulated sugar until light and fluffy.
- Add eggs one at a time, mixing in the vanilla extract.
- Fold in the dry mixture until just combined.
- Fold in the grated apples and walnuts if using.
- Pour the batter into the prepared baking pan and spread it out evenly.
- Bake for 30 to 35 minutes or until a toothpick comes out clean.
- Let the cake cool completely in the pan on a wire rack.
- For frosting, beat together cream cheese and butter until smooth. Gradually add powdered sugar and vanilla.
- Spread the cream cheese frosting over the cooled cake, slice, and serve.
Notes
For extra moistness, add a splash of unsweetened applesauce to the batter. You can also toast the walnuts for deeper flavor.
- Prep Time: 20 minutes
- Cook Time: 35 minutes
- Category: Dessert
- Method: Baking
- Cuisine: American
Nutrition
- Serving Size: 1 slice
- Calories: 320
- Sugar: 18g
- Sodium: 250mg
- Fat: 14g
- Saturated Fat: 7g
- Unsaturated Fat: 4g
- Trans Fat: 0g
- Carbohydrates: 45g
- Fiber: 2g
- Protein: 4g
- Cholesterol: 60mg
Let’s Make It Together
Gather your loved ones and roll up your sleeves, because making this delightful cake is as enjoyable as eating it. With its tender crumb and sweet apple flavor, you’ll find it hard to resist sneaking a piece before the frosting even makes its appearance! Let’s dive right in and whip up something truly special.
What You’ll Need
- 2 cups all-purpose flour
- 1 tsp baking soda
- 1/2 tsp salt
- 1 tsp cinnamon
- 1/2 cup unsalted butter, softened
- 1 cup granulated sugar
- 2 large eggs
- 1 tsp vanilla extract
- 2 cups grated apples
- 1/2 cup chopped walnuts (optional)
- 8 oz cream cheese, softened
- 1/4 cup unsalted butter, softened
- 2 cups powdered sugar
- 1 tsp vanilla extract
Step-by-Step Directions
- Preheat your oven to 350°F (175°C) and grease and flour a 9×13-inch baking pan, giving it a nice snug coat to keep your cake from sticking.
- In a medium bowl, whisk together the flour, baking soda, salt, and cinnamon until the spices are evenly distributed, releasing a warm fragrance that promises deliciousness.
- In a separate large bowl, beat the softened butter with the granulated sugar until the mixture is light and fluffy. This is where the magic begins!
- Crack in the eggs one at a time, integrating them fully with each stir before adding in the delightful hint of vanilla extract.
- Slowly and gently fold in the dry mixture until just combined; remember, a tender cake is the goal, so we want to avoid overmixing.
- Now for the fun part! Fold in the grated apples and walnuts if you’re using them. This step not only brings texture to the cake but also adds little pockets of natural sweetness that you’ll love.
- Pour the batter into the prepared baking pan and spread it out evenly — it doesn’t have to be perfect, just cozy!
- Bake for 30 to 35 minutes or until a toothpick inserted in the center comes out clean. Keep an eye on it; the smell will be irresistible!
- Once baked, let the cake cool completely in the pan on a wire rack. Patience pays off!
- For the frosty finish, beat together the cream cheese and butter until smooth and creamy. Gradually add the powdered sugar and last bit of vanilla until it’s a beautifully luscious consistency.
- Spread that heavenly cream cheese frosting generously over the cooled cake, cut it into slices, and watch those smiling faces when they take the first bite!
Nutritional Snapshot
- Serving Size: 1 slice
- Calories: 320
- Protein: 4g
- Carbs: 45g
- Fat: 14g
- Fiber: 2g
Packed with delightful flavors and textures, this cake surprisingly manages to balance enjoyment and satisfaction, keeping you full without feeling heavy. It’s perfect for sharing afresh or savoring in quiet moments.
Perfect Pairings
This cake shines on its own, but it truly comes alive when paired with a warm cup of cinnamon-spiced tea or freshly brewed coffee. Picture a cozy family dinner setting with soft lighting, laughter echoing, and this cake as the centerpiece. For a delightful brunch, serve it alongside a fruit salad or yogurt. Just imagine everyone gathered around, enjoying each delicious slice together!
Keep It Fresh
If you happen to have any leftovers (which is rare but can happen), store the cake in an airtight container in the refrigerator for up to five days. You can also freeze un-frosted slices for later enjoyment; just wrap them tightly in plastic wrap and place them in a freezer-safe bag. When you’re ready for a taste, simply thaw in the refrigerator overnight and enjoy that fresh apple goodness again!
Betty’s Secrets
- For extra moistness, add just a splash of unsweetened applesauce to the batter.
- If you love a little zest, add some lemon juice or orange zest to the frosting to brighten up the flavors.
- Consider toasting your walnuts before folding them in for an additional depth of flavor.
- Using a mix of apple varieties will create a rich complexity in taste — Granny Smith and Honeycrisp are a wonderful combo!
- Don’t skip letting the cake cool completely before frosting; it helps maintain the delightfully creamy texture of the frosting.
Creative Twists
- For a seasonal spin, add pumpkin spice to the batter during the fall for a cozy, autumnal flavor.
- Try swapping half of the grated apples for shredded carrots for a delightful twist — apple carrot cake, anyone?
- Mix in dried cranberries or raisins for a chewy contrast that adds sweetness and texture.
Your Questions Answered
What makes this Irresistible Fresh Apple Cake unique? It combines the delicious flavors of fresh apples with a rich cream cheese frosting, creating a moist and delicate cake that stands out among desserts.
Can I use other fruits besides apples? Absolutely! Pears or even grated zucchini could be delicious substitutions for a lovely twist on texture and flavor.
How do I know when the cake is done baking? A toothpick inserted in the center should come out clean, and the edges will begin to pull away from the pan, showing its golden sides.
What’s the best way to frost the cake? Start with a smooth layer over the top, then gently spread it down the sides. Use an offset spatula for the best results, creating that lovely rustic look!